


10 Easy DIY Steps for Painted Countertops to Last Long
678Views
Revamp the look of an old countertop without having to replace it since a new alternative can be quite expensive, and the process may damage the old setup. Besides, replacing countertops at home entirely can be a tedious and risky undertaking.
So, suppose you want to avoid the inconvenience and added expense of changing worktops. In that case, you can simply have painted countertops with versatile materials and colors or use kits that can help you replicate stone or granite finishes that last for long durations.
To ensure that you get an authentic finish, you can research to find the correct tools or materials according to your interior space and learn to paint your tabletop and enhance its appearance.
You can also use budget-friendly material like laminate and pair it with interior acrylic paint to get lasting results or use the same procedure to restore any work surface and design it like a sophisticated countertop.
DIY Steps to Paint Your Laminate Countertops on a Budget
Transform your old laminate with DIY-savvy painted countertops with simple instructions listed in this guide:
Step 1: Weigh Your Options

Before you get started with DIY painted countertop ideas take a look at the pros and cons of this project.
Common mistakes that occur with this DIY project are inadequate preparation, choosing the wrong tools, and not letting enough time to let the layers dry before moving on to the next step. Skimping on the final sealing step could also affect the durability of the surface. Remember to use food-safe sealant since the kitchen counter will be in contact with edibles. Additionally, take care of the edges to prevent water from being caught in between the counter and walls to get a seamless, elegant look.
To begin with, this is a fairly easy task that does not require extensive supplies or electronic tools. You can use inexpensive materials to reform the top and resemble marble or other stone surfaces.
However, decide if this is worth the risk since removing paint from an old worktop is very difficult. At times fixing old cabinets, repainting walls, and replacing existing light fixtures can give a new appearance.
If you are fixated on the idea, learn DIY skills to undertake this task and practice with a small corner before changing the entire kitchen or bathroom top. Calculate and monitor the wait time needed to dry paint before proceeding to the next step, or you may ruin all the hard work.
Having said this, if you are confident about painted countertops, invest in kits or choose from specific products that offer infinite shades, patterns, and textures which allow you to maintain a uniform look throughout the room.
Step 2: Choose Appropriate Materials

Stone surfaces like marble and granite can add to the aesthetic appeal, but the price tag may not fit your budget. Thus, a simple and viable replacement of painted countertops can help you customize the interior look by matching color and theme preferences.
The following list may be long, but most items can be repurposed from your garage, or you can purchase a kit at affordable rates:
- Drop cloth or rag
- Protective goggles
- Dust mask
- Work gloves
- Degreasing cleaner
- Premium quality trim brush
- Medium-grit sandpaper
- Sanding block
- Palm sander (optional)
- Contact cement
- Mineral spirits
- Painter’s tape
- Paintbrush
- Laminate paint kit
- Interior acrylic paint
- Paint tray with liner
- Paint roller and roller covers
- Latex-based paint and primer
- Topcoat sealer or countertop resin
- Blowtorch
While acrylic paint gives a sturdy surface, you can also use water-based paint that can be easily cleaned and maintained at regular intervals. Also, remember to perform this activity in an open area or places with proper ventilation while creating painted countertops.
Step 3: Prepare the Working Area

To begin with, examine your worktop to check if any laminate has separated from the particle board, which can be simply repaired with contact cement. After a while, basically clean the surface with kitchen detergents or soap and water to remove any built-up oil, dirt, or grime, and ensure to avoid ammonia-rich cleansers.
Then, to give the primer and paint a proper surface to get attached, scratch the worktop with sandpaper or a palm sander to fasten the process. You can also use a sanding block for corners and use mineral spirits to clean minute dust. Finally, use a rag to adequately clean the surface before you proceed to the next step.
Tip: For creating a natural stone countertop, use trisodium phosphate (TSP) to clean the laminate surface.
Step 4: Securing the Work Area

To thoroughly clean the laminate surface, use a degreasing cleaner that will remove all dirt, grease, and residual oils. You can also wipe the surface that is to be painted with a deglosser that will make the surface dust-free completely.
Wait for the mineral spirits to dry and tape along the worktop edges and fixtures adjacent to the counter, especially the kitchen cooktop or stove, sink, cabinets, and refrigerator. You can also use painter’s tape to block areas and surrounding fixtures to ensure no paint splashes on them.
Once the area is primarily wiped down with basic cleaning supplies, you can get it ready for sanding.
Step 5: Sand the Countertop Surface

For this step, wear protective goggles, work gloves, a respirator, or a dust mask before you get to lightly sanding the laminate surface. To help the paint adhere to your worktop, slightly moisten a cloth and wipe the counter clean.
Before painting, it is imperative to sand the surface. For this, use moderate or fine grit sandpaper (150 to 200) that will help remove rough spots from your counter. You can also use an electric sander which will quicken the process.
Now that the working area is sanded completely, pour mineral spirits on a lint-free cotton cloth to remove the dust. Let the spirit dry completely and ensure the countertop surface is clean and smooth. Failing to do this will give a rough touch if any dust remains when the counter is painted.
Step 6: Prime the Laminate Countertop

Once you have a clean and secure area, begin by priming the counter. Pour some primer into a tray and use back-and-forth motion with a roller to apply it to the counter. You can also use a brush and a small foam roller to trim and paint flat areas with a primer.
For corners and edges, use a separate roller or paintbrush. To get a consistent flat texture, apply the layer while the primer layer is still wet and ensure to overlap previous brushing by a few inches while maintaining a wet edge.
Use a white base bonding color so that any underlying tints can remain hidden with your newly painted countertop colors. Always apply a thin coat and allow each layer to dry completely. For the exact drying time, read the manufacturer’s label or instructions given.
Pro tip: to make the countertop resemble a natural stone surface, use an oil-based primer and apply it using a smooth roller. You will also need to apply a base coat of oil-based enamel before painting.
Step 7: Prepare Surface for Painting

Picking the right materials also includes choosing an appropriate paint, a water-based alternative that can be cleaned easily and is low on odor. For a darker top, add a tint to your primer and opt for a well-adhering paint like an epoxy coating. With thicker paints, make sure there are no lumps or bubbles that might hinder your painting procedure.
While you are waiting for the primer layer to dry, prep the paint supplies and discard tray liners, roller cover, and clean brushes with mineral soaps or basic cleansers. Also, ensure the surface is cleaned again before you begin painting.
Secure the taped areas and check if floors, cabinets, and other furnishings are still adhered to the painter’s tape. In addition to this, you can use covers to protect walls and other furniture pieces from getting painted accidentally.
Step 8: Get Painted Countertops

After cleaning and priming your worktop, mix and pour paint onto a tray. Use a fresh roller to apply paint on the countertop. Like the primer, overlap each stroke to maintain a wet edge. Switch your brush to reach corners, backsplash, and small areas. If your countertop requires a second coat, repeat the process after the first layer dries, but ensure to use a clean brush, tray liner, and roller cover.
For multiple painted countertops, apply three coats of white paint and let it dry for at least 4 hours. You can also use a small foam roller or brush with mini trays to apply a thin layer of hybrid paint that makes use of acrylics and a semi-gloss finish. With two coats of paint, allow adequate drying time in between, or read the manual for the exact waiting time.
Tip: You can also add accent colors and use a portion of the sponge to create holes and textures or make the surface look like a natural stone countertop.
Step 9: Work on The Topcoat

Once the painted countertop has dried, apply a layer of glossy topcoat that gives a shiny look. The top coat also protects your countertop from water spills, scratches, and any other deteriorating elements while maintaining durability.
You can also use a water-based acrylic topcoat and paint it using the above-mentioned technique while keeping a wet edge. Similarly, use clean supplies and rollers to overlap strokes and fresh brushes to cover corners and edges. Dry the entire surface for approximately 4 hours and apply a second coat. Let the surface dry for at least 24 hours before using it normally. The full cure time for a topcoat is roughly 14 days, so use your countertop gently during that duration.
You can also paint marble veins in small sections by using a dry brush to dab areas and give a smooth appearance or use a small foam brush to add texture to the veined patterns.
Step 10. Seal the Deal

After drying the paint, topcoat, and designed creations, seal the worktop with a protective layer of glossy resin that adds to the longevity of the surface. To accomplish this process, pour the resin over the painted countertop and use a clean foam roller to apply it evenly.
Wipe off the edges with a damp cloth immediately and pop any bubbles that may appear, or use a blue torch to remove the formation of any bubbles on the surface. With appropriate drying time, apply additional coats to get a glossy appearance. You can also use polyacrylics in the mix to get a refined granite look.
For epoxy or acrylic topcoats, you can use a small foam roller or large foam brush that will help achieve a textured appearance. Ensure to use the countertop with care for the next 14 days.
With stone worktops, use fine-grain steel wool to rub the painted countertop and use an oil-based polyurethane to coat the surface. Allow the area to dry completely before removing the painter’s tape.
Final Thoughts
Painted countertops can give a personal touch to your interiors. You can draw basic lines or veins without worrying about being too perfect for getting a natural feel or simply twisting your brush to get an abstract look like an authentic marble surface. If you are still nervous, use light colors or mix a little white base with dark shades to paint veins on the surface.
With simple DIY skills, you can now save money and completely transform your kitchen or bathroom-painted countertops. You can maintain your new worktops by cleaning them daily with a mild detergent and soft sponge or at least wipe them regularly. You can also set a weekly or bi-monthly routine to scrub and clean counters that help remove dirt and other residual particles.
Frequently Asked Questions
What is Used to Upgrade Laminate Countertops Without Direct Replacement?
You can upgrade laminate countertops by covering them with an inexpensive alternative of tiles. You can also use contact paper as a short-term solution to cover old counters or use epoxy paint that will last for a year or so.
For How Long Will These Painted Countertops Last?
Depending on the usage and care taken to maintain it, the average time for a refinished countertop is 5 to 7 years, while some of them can remain durable for an entire decade.
Can You Increase the Durability of Painted Countertops?
To ensure painted countertops have a durable finish, take care to sand, clean, and dry the surface properly while applying the primer, paint, topcoat, and sealant. Also, dry each coat completely before applying the next layer.
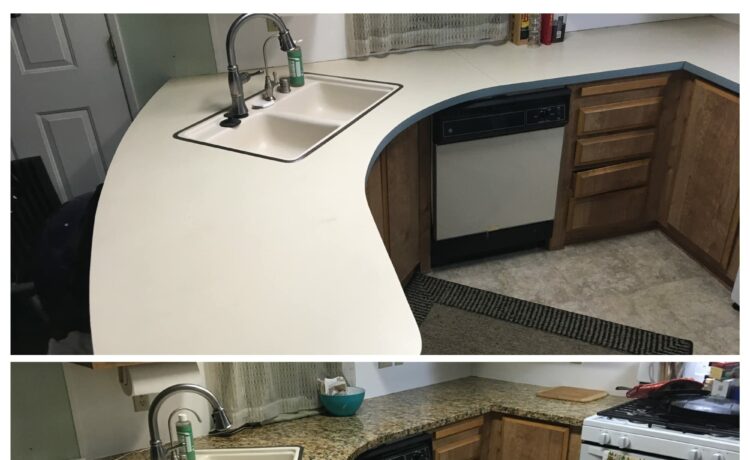
Is There a Way for Painted Countertops to Look Like Granite?
After you sand and prime your laminate surface, apply a couple of base color layers, allow them to dry, and then use a sponge to dab with lighter tints and create customized patterns. Once all the layers dry, finish with a topcoat and resin.
How Can Paint Countertops Look Like Quartz?
Following the usual painting procedure, apply coats using a sponge and brushes, then crumple paper, towels, or other craft supplies like metallic flakes, glitter, and acrylic paints to create a quartz-resembling appearance. After drying your paint, use fine-grit sandpaper to wipe the surface clean and seal the surface with a topcoat or resin.


