


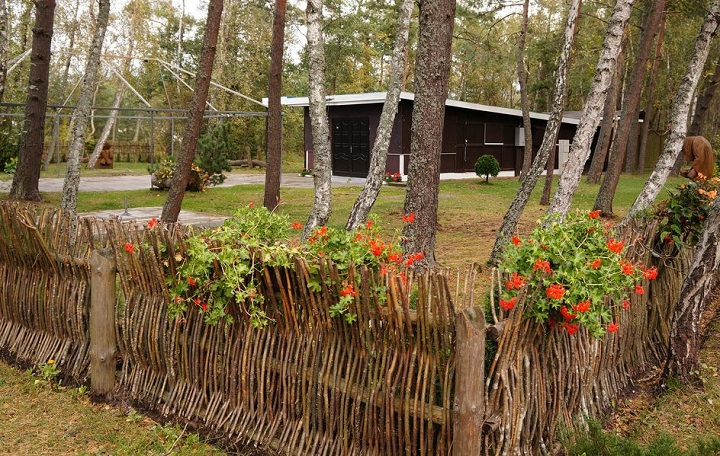
As the name suggests, a wattle fence is a type of fence that is made up of weaving together twigs and branches. Wattle in ancient is termed as frames. These wattle fence structures are long-lasting and robust, which is why it was widely used in the ancient period to protect crops and to store animals.
Moreover, it is made up of completely natural products that are available around the fields. Not only does wattle fencing add a touch of natural charm, but it also serves as a functional enclosure for privacy, security, and plant support.
In this article, we will provide you with a step-by-step guide on how to build a wattle fence, as well as essential tips to preserve its longevity. So roll up your sleeves and arrange all the necessary equipment and create something beautiful and fun for your garden. This DIY activity is full of fun, so make sure that you enjoy it while making this wattle fence.
What is a Wattle Fence?

Before we proceed with the steps to build a Wattle fence, it is necessary to know what it actually is. Wattle Fence is a simple construction that is made by weaving thin branches in between upright stakes. This simple format is made by stacking one above the other branches together.
Moreover, this DIY construction was traditionally famous in the British Isles, Ireland, and other parts of Europe. Also, this traditional technique to protect plants and animals dates back to Neolithic times and is popular today.
Moreover, the beauty of wattle fences lies in their organic and sustainable nature. As it is made up using branches from renewable sources, wattle fences are environmentally friendly and blend harmoniously with natural surroundings.
The open weave of the fence allows air and light to pass through while still providing a sense of privacy and enclosure. Also, these fences are not only aesthetic but are known for their durability and strength. The interwoven branches create a resilient structure that can withstand moderate wind and provide a natural barrier. With proper maintenance and occasional repairs, a well-built wattle fence can last for many years.
Step-by-Step Process of Creating a DIY Wattle Fence
Wattle fencing is a traditional method of creating rustic, beautiful, and eco-friendly barriers for your garden, yard, or property. Moreover, below is the step-by-step process required to build a wattle fence. Make sure you have all the necessary equipment and follow all the steps correctly.
Material Required
- Willow or hazel branches (flexible and long)
- Wooden posts
- Twine or wire
- Pruning shears
- Gloves
- Measuring tape
- Hammer
Once you have collected all the necessary equipment then, you can begin the process of creating a wattle fence for your property.
Step 1: Planning and Preparation

Creating your own wattle fence is not an easy task, and it requires planning and preparation. Thus you need to determine the ideal height, length, and location where you want your wattle fence. Take a clean look at these aspects and determine the terrain.
Also, mark the position where you want to install the wooden posts. This is an essential step as it will serve as the framework for your wattle fence. Once you have determined all these aspects of creating the wattle fence, you can proceed to the next step.
Step 2: Collecting & Preparing Branches

Since branches are the most important thing to create these wattle fences, thus, you need to choose branches that are flexible, about half an inch to an inch in diameter. Willow and Hazel are great options because of their flexibility and durability. Cut the branches to the desired length, leaving some excess to anchor them securely in the ground.
In case you find that you don’t have the branches of willow or hazel but still want to make the wattle fence, then you can proceed. You can start construction as long as the branches are long enough to bind things properly. Once you have prepared your branches now, you can proceed to the next step to create your wattle fence.
Step 3: Setting Up the Wooden Posts

This is also one of the crucial steps in building your own wattle fence. The wooden post is the framework on which the wattle fence is made. All you need to do is dig holes for your wooden posts. The spacing between the posts will depend on the desired strength and overall aesthetic. Typically, a gap of 6 to 8 feet is suitable. Insert the posts into the holes and firmly pack the soil around them to ensure stability.
Step 4: Weaving Everything Together

The wattle fences are durable and robust because of their weaving mechanism. So now you have collected all the necessary equipment, all you need to do is begin weaving the branches horizontally between the posts. Start from the bottom and then make your way up. Further, to secure every single branch use twine or wire to tie the branches all together with the posts. Overlap the branches slightly to create a dense and sturdy fence.
Be sure to alternate the weaving pattern (over-under-over) with each new layer of branches to enhance the strength of the structure. Weave until you get the desired height that you desire.
Step 5: Trimming and Finishing Touches

The major steps have been completed, and you have got the desired height that you wanted for your wattle fence. Now all you need to do is trim any excess branches that extend beyond the top of the fence to maintain an even and neat appearance. Make sure all the branches are securely fastened to the posts, and adjust the tension of the twine or wire if necessary.
Once you have looked for all the finishing touches, the next step you need to do is take a step back and admire the creativity that you used to create a beautiful wattle fence. These are the steps to create a natural aesthetic for your garden. Follow all these steps to create your own Wattle fence.
Why Use Wattle Fence?
Well, there are so many uses for Wattle fences. However, we have mentioned some of the key reasons to use a wattle fence.
- To protect the land by creating a boundary.
- To create a natural aesthetics in your garden and to create a division between different areas of your garden.
- This wattle fence also creates a privacy screen for an outdoor seating area.
- You can decide the height of the fence and create a boundary to keep pets safe and secure.
- These fences are breathable and also allow light to penetrate. Thus, it is suitable for plants and vegetation nearby.
These are key features that this wattle fence offers and they are very durable and provide rustic charm to the space. Thus you can surely have one of these in your garden.
What Type of Wood We Can Use to Make Wattle Fences?
The branches or sticks used for weaving are typically made from flexible and pliable wood when constructing a wattle fence. Some commonly used woods for making wattle fences include:
- Willow
- Hazel
- Osier
Moreover, Alder, Birch, and Maple are also good options. However, they should be super-fresh.
1. Willow as Wattle Fence

Willow branches are a popular choice for wattle fencing. This is because they are high flexibility, strength, and a fast growth rate. Also, they are easy to bend and weave. Therefore, they are suitable for creating intricate patterns. Willow is known for its resilience and durability, making it suitable for outdoor applications.
2. Hazel as Wattle Fence

If you are looking for other branches, then you should definitely try Hazel branches, as they are another excellent option for wattle fences. The prime reason is that they are strong, flexible, and readily available. Moreover, the distinct quality is that it is long-lasting and can adhere to any outdoor conditions. It is often chosen for its natural beauty and ability to blend well with the environment. Thus it will contribute to creating a natural aesthetics for your garden.
3. Osier as Wattle Fence

This is the most common wood option to create a wattle fence. This is because it is known for its long, thin, and flexible branches that can easily weave together to form a wattle fence. Moreover, the osier is prized for its strength, flexibility, and attractive appearance, making it a favored choice for wattle fences.
These are the excellent options that are best suited for making wattle fences. It’s important to choose woods that are flexible and have good bending properties, and this is because it allows for easier weaving and ensures the structural integrity of the fence. Moreover, when you select the wood, you should choose branches that are the same in size and thickness to ensure consistent weaving throughout the fence.
How to Preserve Your Wattle Fence?

These wattle fences are a great option for your garden to create boundaries, and they are a long-lasting option. But to maintain the longevity and durability of your wattle fence, you need to put the effort in order to preserve it. Thus, we have mentioned some steps to preserve your wattle fence.
- Apply Protective Coating: This is necessary as you need to protect your wattle fence. Thus, you need to use a natural wood preservative or sealant to protect the branches from moisture, UV rays, and insect damage. Further, you need to apply the coating according to the manufacturer’s instructions before and after installation.
- Regular Inspections: Also, it becomes of utmost importance to conduct routine inspections to check for signs of damage or wear. If you detect any damage, then you need to repair any loose or broken branches immediately to maintain the durability of the fence.
- Seasonal Maintenance: In different seasons, the branches need to be protected according to the ongoing season. Thus, during the winter months, when the fence is more susceptible to moisture, trim away any overhanging branches or vegetation that could cause excessive moisture retention and decay.
- Avoid Ground Contact: Ensure that the bottom of the wattle fence is not in direct contact with the ground to prevent moisture absorption. Further, leave a small gap between the fence and the soil to promote air circulation and prevent the rotting of the branches.
Conclusion
Building your own wattle fence for your garden is a fun task to do. Thus, it is necessary to enjoy every moment of it. This little DIY project is easy and long-lasting, and it adds both functionality and natural beauty to your surroundings. Moreover, anyone can do this project even if they do not have any knowledge of building anything.
However, you need to use the right materials, proper technique, and a little maintenance, and your wattle fence can last for many years. Also, these fences are a popular choice because of their practicality, sustainability, and beauty. Thus, if you are looking to enhance your garden or add a rustic charm to your property, then you should surely opt for this wattle fenceidea, as it can be a rewarding and fulfilling project.
Now you have all the basic knowledge of how to build a wattle fence from scratch. So roll up your sleeves and collect all the necessary equipment to build your own wattle fence.
Tags:Wooden Wall


