


6 Simple Steps to Stain Your Wood Fence Quickly and Easily
60.7KViews
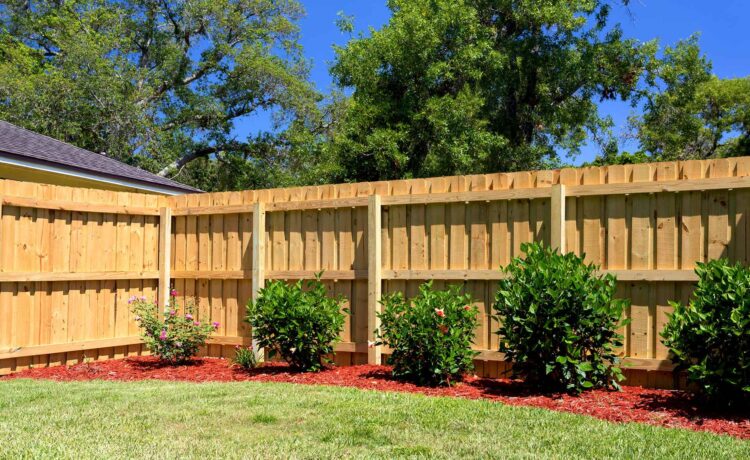
We spend so much time and money buying our dream house, but we often forget to point out the details that are not in the house. For example, the fence that is the boundary of your house. You should stain the wood fence of your house on a daily basis as it would maintain the quality of your fence.
Moreover, it will also let your fence be functional in the long run. Also, adding a fresh coat of stain to your fence enhances its appearance and protects it from the elements, prolonging its lifespan. Staining a fence is a relatively straightforward process that can be accomplished with a little time and effort.
In this article, we will provide you with a step-by-step guide on how to stain a fence effectively, ensuring a beautiful and long-lasting finish. Thus, now you need to get active and stain wood fences outside your house to give that glamorous look to your house.
Why is It Necessary to Stain Wood Fences?

Well, it is necessary to stain wood fences regularly for several reasons. Mainly it is done to provide essential protection and prolong its lifespan. Also, wood is vulnerable in nature to elements such as sunlight, rain, and temperature changes. Thus, staining creates a protective barrier on the surface of the wood, shielding it from UV rays, moisture, and other weather elements.
Moreover, stained wood fences will be away from issues like warping, cracking, splitting, and rotting, which is not good for the health of the fences in the long run. Additionally, these are the functionality that works better on the strength and longevity of the wooden fence, but stained wood fences also add beauty wherever it is placed.
It enhances the fence’s appearance by adding color, highlighting the natural beauty of the wood, and giving it a refreshed and finished look. Ultimately, staining a wooden fence is a proactive measure that ensures durability, enhances aesthetics, and preserves the investment you’ve made in your property.
Easy Steps to Stain Wood Fence Quickly

A wood fence adds warmth, charm, and privacy to your outdoor space. However, exposure to the elements can take a toll on its appearance and structural integrity. Thus, we have mentioned steps to stain wood fences so that you can complete this DIY project hassle free.
Materials Required for Staining the Wooden Fence
- Stain (depending on your preference)
- Exterior-grade brush, roller, or sprayer
- Paint stirrer or mixing stick
- Drop cloths or plastic sheets
- Gloves, goggles, and a mask)
- Power washer or hose
- Sandpaper or a power sander (if needed)
- Wood cleaner or mild detergent
- Scrub brush or pressure washer (if needed)
- Rags or old towels
- Painter’s tape (if necessary)
Step 1: Prepare the Area

It is obvious that before you begin your DIY project, you should clear the area where you are going to perform the activity. Thus, begin by clearing any furniture, plants, or objects near the fence.
Lay down drop cloths or plastic sheets on the ground to protect it from drips and spills. If your fence is adjacent to a building or other surfaces you want to keep clean, use painter’s tape to protect them. Once you are done, you can begin with the next step.
Step 2: Clean the Fence

Cleaning the fence before staining the wood fence is crucial in preparing the wooden surface for optimal stain penetration and adhesion. Over time, a fence can accumulate dirt, grime, mildew, and other contaminants that can hinder the staining process and compromise the final result.
Cleaning the fence involves using a power washer or a hose with a high-pressure nozzle to remove debris, loose paint, and any surface contaminants. Additionally, a wood cleaner or mild detergent can be used along with a scrub brush or pressure washer to tackle stubborn stains and ingrained dirt.
By thoroughly cleaning the fence, you create a clean and smooth surface that allows the stain to adhere properly, ensuring a more even and long-lasting finish.
Step 3: Sand the Surface

In order to stain a wood fence, you should sand the wooden fence, as it is an essential step that helps create a smooth and even surface for optimal stain absorption and adhesion. Moreover, sanding removes rough spots, splinters, and any previous coatings, allowing the stain to penetrate the wood fibers effectively.
Thus, you should use sandpaper or a power sander. You can smooth out imperfections, such as raised grain or uneven areas, resulting in a more uniform and professional-looking finish. Sanding also opens up the pores of the wood, enhancing the stain’s ability to soak in and adhere properly.
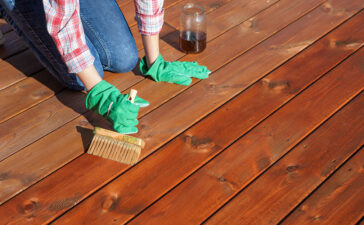
Step 4: Apply the Stain

Stir the stain thoroughly using a paint stirrer or mixing stick to achieve an even consistency. However, before applying the stain to the entire fence, it is advised to test it on a small area to confirm the desired color and finish of the stain. Once you are assured that the stain that you are looking for is what you got, you can apply the stain to your wood fence.
Depending on your preference and the size of the fence, you can use a brush, roller, or sprayer. Begin at the top of the fence and work your way down, applying the stain in long, even strokes following the grain of the wood. Be sure to cover the entire surface, including the edges and hard-to-reach areas.
Step 5: Let It Dry

As mentioned above, it takes a maximum of two days to dry completely. Thus, you should stain wood fences in the summer season. However, once you are done applying the stain, you can use a clean or old towel to wipe off any excess or drips. Further, then you need to allow the stain to dry according to the manufacturer’s instructions.
However, it can take up to several hours or even a full day to dry. This also depends on the type of stain and weather conditions. Thus, you need to have patience and avoid any contact with the fence during the drying process.
Step 6: Apply a Second Coat

This step is completely optional if you don’t like the stained wood fence after the first coat. So to enhance the protection and also to beautify the fence even more, you can apply the second coat. Repeat the same application process as before, ensuring consistent and even coverage. Allow the second coat to dry completely. Once you are done, just leave it to dry peacefully to have that enriched structure.
These were easy 6 steps to have a good stained wood fence to protect your boundary wall and ensure the fence’s longevity. Thus, follow these steps accordingly to have a beautiful, freshly stained fence outside your house.
What is the Best Time to Stain a Wood Fence?

Staining a wooden fence can be a hard task as well as time taking process. This is because the stain itself takes two or more days to dry. Thus, the best time to stain a wooden fence can be considered as the early or late summer. This is because you would want days that are warm and dry both before and after you are planning to stain, as the wooden fences need to be dry completely.
Thus, be sure that the wood is completely dry as you check prior to the day you are going to stain the wood fence. It is also recommended that you avoid staining in extreme heat as it will let your stain meltdown and damage your health in the hard summer.
Pros and Cons of Staining a Wooden Fence

Everything in this world has pros and cons. Thus we have curated a list mentioning the pros and cons of staining wood fences so that you can evaluate them before starting this project.
Pros
- Staining creates a protective barrier that shields the wood from the damaging.
- Stain penetrates the wood fibers, which makes the fence more resistant and hence enhances its durability.
- It increases the aesthetic appeal of the wood fence.
- Stains come in various colors. Thus, you have so many options according to your personal style.
- Stained fences are generally easier to clean and maintain compared to bare wood.
Cons
- It is a time-consuming process.
- It can be expensive according to the application tools.
- It becomes a necessity to re-stain the entire fence to maintain the protection.
- It takes two days to dry.
Considering these pros and cons is important when deciding whether to stain wood fences. Ultimately, the decision should be based on your personal preferences, the condition of the fence, and your willingness to invest time and resources in its maintenance.
Type of Stain for Wooden Fence
There are three types of stains available for staining wood fences. They have different compositions, appearances, and levels of protection. However, we have mentioned all three types of stains for your wood fences so that you can select the best one for you.
1. Transparent Stain

Transparent stains are popularly known as clear stains and allow the natural beauty of the wood to show. Moreover, this stain provides minimal color enhancement. Also, these stains provide a subtle sheen which is great for that shine on the fence. However, these stains offer the least amount of UV protection.
Transparent stain wood fences are an ideal option if you want your old wooden fence to maintain the natural look of the wood while protecting it from moisture and mildew. Also, if you are choosing a stain for new fences, these are also great options.
2. Semi-Transparent Stain

If you have fences in your home that are 5-10 years old, then you can opt for these semi-transparent stains, as they offer a blend of color and wood grain visibility. Moreover, these stained wood fences provide moderate UV protection while allowing the natural texture and grain of the wood to shine through.
Also, these stains add a hint of color to the wood, enhancing its appearance while still maintaining a somewhat transparent look. Thus, these semi-transparent stains are a popular choice for fences as they provide a balance between color and wood’s natural beauty.
3. Solid Stain

As the name suggests, these stains are popularly known as opaque stains, and they provide the highest level of color and protection for a wood fence. However, apart from the transparent and semi-transparent stains, these have the highest UV protection. At the same time, they also create a uniform appearance as they hide the natural grain and texture of the wood.
Also, these stains come in various colors, and they change the complete look of the pre-stain wood fence as they provide a consistent and solid finish. Moreover, they are particularly useful for older or weathered fences with imperfections that you wish to conceal.
Conclusion
Staining a wood fence is a rewarding and relatively simple process that can greatly enhance its longevity and appearance. By carefully following these step-by-step instructions, you can protect your wood fence from the elements while preserving its natural beauty. However staining wood fences can be a time taking process, but it is totally worth it and easy to complete.
You can do it single-handedly. However, if you want any assistance, then do take some help as it can take a lot of time to complete. Most importantly, don’t forget to choose the right stain before you begin to work. Also, prepare the surface adequately and apply the chosen stain evenly. This will give the best result in your desire.
Moreover, with proper care and time-to-time checking, your newly stained wood fence will be a stunning addition to your outdoor space for years to come.


