


I finished adding some winter greenery to my front window box this morning. I worked on it all week in small 20-30 minutes intervals while Cooper was napping. As soon as he would close his eyes I would run downstairs, throw on my winter gear, and head outside with the baby monitor. It worked out because breaking it up into small chunks of time ensured that I didn't die of hypothermia while I was out there. It's soooo cold out already. Brrrrrrrrrr.


The first thing I did was empty my window box of all the dead summer plants. I pulled out the root balls where I could but made sure to leave enough soil along the bottom of the box to stick the evergreen branches in.

Once the window box was cleaned up, I bundled up in about ten layers of clothing and headed out into the bush to practice my lumberjack skills. I brought some extra large leaf bags and some tree snips with me. I went to a secret location (heh heh heh) near my house that has an abundance of pine and fir trees. I filled up about three extra large leaf bags with pine and fir branches. Don't worry, I made sure to trim only a few branches per tree so that I wouldn't damage them!
Next, I brought out a step ladder and started filling up the box with the pine branches. I started with a row along the back of the window box. I was really selective with these and made sure to choose ones that were really sturdy and upright.

Once I filled the box with a row of pine branches all along the back, I added another row along the front. This time I chose branches that were a bit curved, or droopy so that they would hang over the edge a bit. Once I had a both rows finished, I added a few extra branches here and there where it was a little bit sparse.

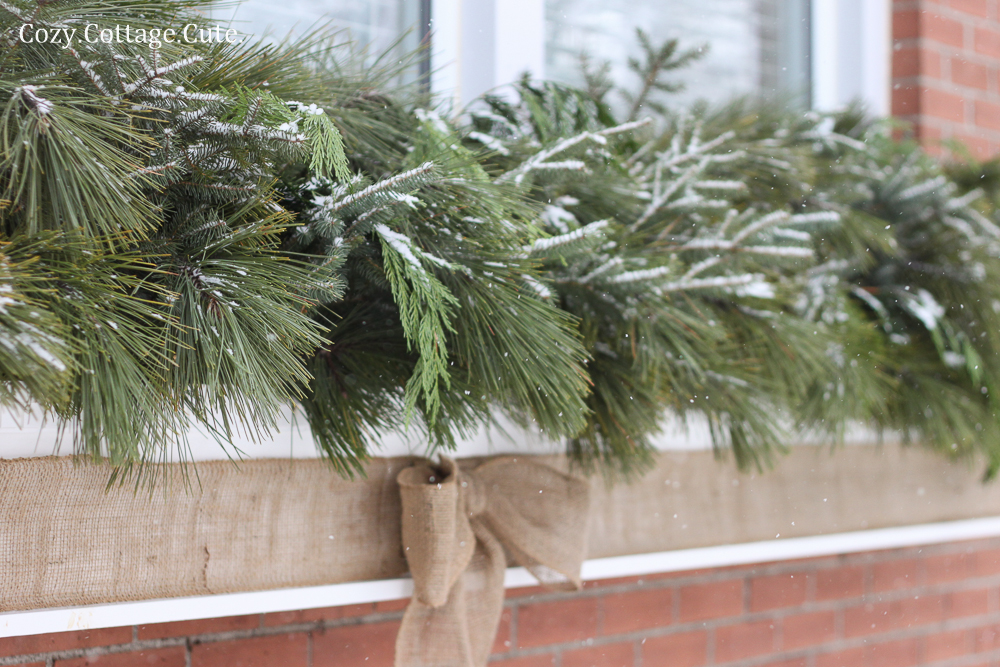
Once I had the box quite filled up with pine branches, I added some fir branches. Similarly, I went along and added some tall, sturdy pieces about 3/4 of the way from the front of the box. Then I added some smaller fir pieces about 1/4 of the way from the front of the box.

Even though my neighbours have some giant cedar trees, I decided not to give their bushes a haircut and went to a local greenhouse to purchase a small bundle of cedar branches for $6.99.

Since I only had a few pieces of cedar, I spread them out evenly and tucked them in amongst the rest of the greenery. I like how they add a little bit of contrast with the dark greens.

Once all of my branches were in place I took a trip to Michael's and purchased a roll of burlap garland for $7.99.
I wanted to wrap the burlap around the window box like a present! I tried to use a roll of Alex's super duper strength tuck tape to tape the garland to the window box but the cold and wet snow were working against me.

Since I think I was getting frostbite by this point, I went inside and found a hammer and some finishing nails.

I used the finishing nails to secure two long pieces of burlap garland to each side of the window box.

I tried to bring both pieces of burlap together at the front of the box to tie a giant bow but the garland kept drooping all over the place.
Instead, I used the extra-sticky, red tuck tape to secure both pieces of garland together in the front of the box. Next, I made a big bow with an extra piece of burlap and secured it in front of the red tuck tape with some more finishing nails.


I am still trying to decide if I want to add some lights to the box or not. I know they will look pretty at night but I'm afraid the wires will be too obvious during the day. What do you think? Lights or no lights?
Updated to Add:
The hydrangea bushes underneath the window box usually look really full and pretty with all of the dried blooms but alas the freakiest hailstorm ever smashed them to bits. That's why they look so strange.
Also, I've been really into holiday decorating with natural elements in shades of white, green, and brown lately. So I purposefully left out any red berries, ornaments, or bling in general. :)
Sharing Here:
Handmade Christmas Link Party @ Clean and Scentsible, Frugal Friday @ The Shabby Nest, Nifty Thrifty Sunday @ Nifty Thrifty Things, DIY Project Parade @ The DIY Show-Off, The Sunday Showcase Party @ Under the Table and Dreaming, Tutorials and Tips Link Party @ Home Stories A to Z, Transformation Tuesday @ The Ironstone Nest, Show Me What Ya Got @ Not Just a Housewife, Outdoor Holiday Decorations Link Party @ The Ironstone Nest


We hung wreaths on our windows and found some battery powered candle lights for the bottom half. They make them in much more stylish options then they used to. Maybe try some of those in the windows? A little light at night without having to worry about wires in the day. It looks gorgeous as is though.
ReplyDeleteThat looks great!
ReplyDeleteThe front of my house has plenty of wires all over the place from our lights, so that doesn't bother me. But I'm not sure you need lights. It all looks gorgeous.
I'd go with the lights, I bet it would be beautiful lit up at night!
ReplyDeleteLights! Definately lights! you can't get too much of them in the winter. Your window box looks gorgeous btw!
ReplyDeleteThese are simply gorgeous. Wow! No lights, unless you'd keep them in and light them through February; putting them in and removing them in a month could mess up your fullness and leave them looking wonky for the rest of the winter.
ReplyDeleteI love it!
ReplyDeleteLights!
ReplyDeleteOooohhh, cute! I LOVE the bow on the box front. If you're looking for opinions, I think some little white or red berries would be cute in there. :) With or without lights, it looks adorable!
ReplyDeleteIt's lovely! Lights would be great too, and some red berries?? Your burlap bow is the perfect touch!!
ReplyDeleteJust love it!! And the burlap bow is final touch! Looks great. Might have to do that out on our shed!! I have an empty window box just waiting for me!!
ReplyDeleteJen
athomeinthenorthwestblog.com
I love window boxes to begin with, but this is great! The burlap ribbon is the perfect touch!
ReplyDeleteLove it. The burlap ribbon is pretty. Looks great! I vote lights!
ReplyDeleteLights would be lovely...(I don't think the wires would cause too much chaos - I do lights in my smaller porch arrangements, and bury the wires into the greenery enough that I don't really think about them at all)...
ReplyDeleteThe burlap blow is perfect for the simplicity of the greens. I think lights would look amazing in the window box - especially with a dusting of snow.
ReplyDeleteIt's so pretty, Sarah! Just my kind of thing, natural and simple. I vote no lights...give yourself a break, girl:) Maura and I went on a walk on Friday and trimmed down some branches from community parts of our neighborhood (I tried to act nonchalant when a car drove by!) and then hit up our backyard for more. No cedar here though either, I always have to buy that stuff.
ReplyDeleteLights!
ReplyDeleteThis looks fantastic btw.
Try adding some christmas ornaments that will dring shine and sparkle!
ReplyDeleteIt looks great! I think I'll steal that burlap ribbon idea for my window boxes!
ReplyDeleteOh it's so sweet and festive! I love all the lush greens!
ReplyDeleteAbsolutely beautiful! I love this idea so much. I think it would look great at night all lit up!
ReplyDeleteLights!!!!
ReplyDeleteLOVE your window box! It's so beautiful. It looks like it's out of a magazine! So glad I stopped by to check it out!
ReplyDeleteAllison
So pretty - I love it! Thanks so much for coming out to the handmade Christmas party at Clean and Scentsible. I'll be featuring this on my Facebook page. Just want to let you know how much I enjoy reading your blog! :) Hope you enjoying all of the Christmas festivities with your little guy.
ReplyDeleteJenn
Beautifully done! It looks so thick and lush! I adore cedar boughs. They're my fav! I think lights would really make it stand out! Hate to make you go back out in the cold though..... hehehe!
ReplyDeletexoxo laurie
Simple & pretty! I love it!
ReplyDeleteLove it ~ so full and festive!
ReplyDeleteoh my gosh, this looks so good, especially with the burlap! i don't think i've been here before...but i will be back! coming over from a-z.
ReplyDeleteI love this! So putting bows on my window boxes next year, thanks for the tip!
ReplyDeleteYour window box looks amazing! I love it.
ReplyDeleteThis looks fantastic. Classic, simple and elegant, just how I like things. Although it wouldn't look bad with lights and/or color, I think it looks great just as it is. There are so many other ideas for outdoor decorating (or indoor decorating that can be seen from outside), I think you don't need to add lights to it. Great job! Makes me want to run out and build window boxes for our house - ha ha
ReplyDeleteL.O.V.E. this! Seriously. Gorgeous. Makes me wish I had a windowbox!
ReplyDelete