A Homemade Burlap Stocking

85

Sunday, November 28, 2010

Updated: Tutorial can be found here.


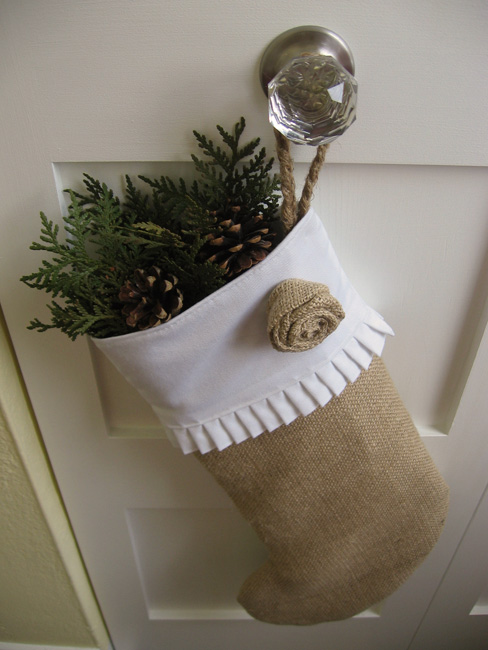
I finally mustered up the guts to try making my own burlap stocking. I had grand plans of making three of them yesterday afternoon. One for me, one for Alex, and a mini one for Roary.

I didn't really anticipate that it would take me ALL DAY and ALL NIGHT to finish one of them. Egads! I had no idea what I was doing. I analyzed my burlap stocking inspiration photos and decided that I wanted: a cuff, white fabric, ruffles, and flowers.

None of the how-to-sew-a-stocking videos on You Tube explained how to make one with a cuff. I had to wing it. I had also never sewn a stocking or a pleated ruffle or a fabric rosette before. It was tricky and I did mess up quite a few times. Let's hope round two goes a little more smoothly. ;)  

I am really happy with how it turned out. I especially love how Alex thinks he's getting twigs and pinecones for Christmas. Hee hee!

Once I'm done all three I'll hang them on the living room railing. For now though, I'll hang this one on a pretty little doorknob in the front entrance.

And now for my little photo shoot:


P.S. Let me know if you are interested in a tutorial. No guarantees it'll be any good, though..... :) 
Linking to:

Flaunt it Friday @ Chic On a Shoestring Decorating, Feathered Nest Friday @ French Country Cottage, Frugal Friday @ The Shabby Nest, Sunday Showcase Party @ Under the Table and Dreaming, Saturday Is Crafty Day @ Along For The Ride, Check Me Out Saturday @ A Vision to Remember, It's Party Time @ It's So Very Cheri, Saturday Soiree @ A Little Lovely, Holiday Decorating and Project Ideas @ Whisperwood Cottage, Make It 4 Monday @ Cottage Instincts, Amaze Me Monday @ Dittle Dattle, White Wednesday @ Faded Charm

Visit thecsiproject.com

Stuff on a Cabinet

18

Saturday, November 27, 2010

New white bowl. L-o-v-e.

The chippy, old cabinet in our dining room has been empty and bare for the longest time. I could never decide what I wanted to put on top: baskets, dishes, plants, photos?  After I found the cutest bowl of all time last weekend (pictured above) I figured it was about time to throw some stuff on top. I shopped the house and found all sorts of white goodies. Oh white, how I love thee.

Empty, bare cabinet.

Cabinet with stuff on it.

Tiny cake plate.

Little bird salt and pepper shakers.

Another white pitcher that I bought by accident.

Tiny creamer thingy.

Hmmm, getting there.
That's how it's looking right now. I can't wait to tweak it with some holiday greenery. :)

Burlap Stocking Inspiration

12

Thursday, November 25, 2010

What did you do last night? After I watched two episodes of Brothers and Sisters (yes, that's the dorky show I was talking about the other day)(just started watching season one)(needed a break from all the boy shows I've been watching with Alex)(okay enough with the excuses) I ended up watching a bunch of You Tube videos on how to sew your own Christmas stockings. Yup. I'm going to attempt my own this year. Lately I am loving white and burlap together. These photos have been my inspiration:

Bella Inspirations

EAB Designs

EAB Designs

EAB Designs

Olive and Fern

My Adobe Cottage

My Adobe Cottage

Cottage and Vine

Red Door Home

HGTV
Aren't they all lovely? I can't decide if I want to have ruffles or buttons or flowers or pom poms or tags or stamps on mine. I've got the burlap. I've got some white fabric. Now all I need is the guts to try this project!

Simple Holiday Bell Garland

42

Monday, November 22, 2010


First, let me say that daylight savings time is working against me. I've been trying to take my pictures right after work when there is still a smidgen of natural light left.... but there never is!!! It's been dark and foggy all week. Annnnnnd, the quality of the following pictures sucks with a capital S as a result. Sorry 'bout that.

As you know, I've been trying to find/make simple holiday decorations this year in shades of white, cream, brown, and green.

I thought I could make some simple garland by spray-painting some bells white and braiding them together with some twine.

First, I bought a pack of bells at Michaels with a 40% off coupon.


Then I took them outside and spray-painted them with matte white paint. In hindsight, I would have used primer first. Good to know for next time.


Once they were dry I dug out some twine.


I cut three long equal strips of twine and attached them to the edge of my dining room table with some tape.


I braided the twine in 3" sections. After every 3" I attached a bell. I alternated back and forth between adding a bell on the right strand of twine and then on the left strand of twine.


I kept going until I ran out of bells. I think there were 19 in the package that I bought.


First I hung them up over the doorway in the dining room.


Then I strung them along the front of our cabinet in the dining room. It would probably look really cute along a mantel (if only I had one).


And that's that.


Alright, I'm off to watch another episode of a dorky girly show that I'm not admitting I watch. :)


Linking to:
Make It For Monday @ Cottage Instincts, Holiday Decorating and Project Ideas @ Whisperwood Cottage, Nifty Thrifty Tuesday @ Coastal Charm, Tuesday's Treasures @ My Uncommon Slice of Suburbia, White Wednesday @ Faded Charm, Power of Paint Party @ Domestically Speaking, Frugal Friday @ The Shabby Nest, Christmas Craft Link Party @ Centsational Girl

Giveaway Winner - Oh Yeah!

5

Sunday, November 21, 2010

I am soooooo excited to announce the winner of my little giveaway. Who knew it would be so much fun to give someone a little alphabet stamper? I only wish I was able to give a little somethin' to everyone who reads, follows along, and leaves sweet little comments all the time. Please know that I appreciate all of your comments, feedback, ideas, and inspiration. I want to be just like you. ;)

And so, the winner of the Alphabet Rolling Stamp is..........


Congratulations, Julane. I am so glad that you entered and, well, won! If you email me your full name and mailing address then I will have your prize shipped to you asap. My email is cozycottagecute@hotmail.com.

Thank you again to everyone who entered and I'll have to think of another fun item to give away when/if I ever reach the big 300 followers. A girl can dream. :)

Note: I thought it was really cute that someone left a completely anonymous entry into the giveaway. Uh, it would be kinda hard to get in touch dontcha think? Heh heh heh.

An Old, Chippy Sign

14


When I say old, I mean realllllly old.

When I say chippy, I mean reallllllly chippy.


At an antique show last spring I wandered around looking for an old, chippy sign. Even though the colours weren't exactly what I would have chosen, when I found this sign I knew I had to get it.

You see, that's kind of my nickname. Here is where I crawl under a rock and die of embarrassment for sharing the hubby's nickname for me on the Internet. Yup. He calls me Peach, Peaches, or Peacher (don't ask about the last one).


My mom said it was a "sign" that I should get the sign. Bah ha ha.

I seem to have this habit of buying things to hang on the walls, leaving them for about a year until I finally make a decision on where they will go, and then hanging them up.

So I finally hung the sign (on a nail 'cause Alex was gone again, hee hee) in our front entrance. The closet has a bi fold door with no trim around it and it always looked a little lost to me.


I thought the colour of the lettering also looked kinda good with the super-cute light fixture that is in there. If you look closely it has little etched stars all over the glass which look really pretty at night with the light shining through. But don't look too closely because it's also full of dust.


It feels good to finally make a decision and get something accomplished. Now if only I could get around to hanging the bell in the dining room, the antique window that also needs to be hung in the dining room, and the two pictures that need to be hung in the sunroom....... 

-------------------------------------------------------------------------------------------------------------

Only 33 sleeps until camera time Christmas morning. 

-------------------------------------------------------------------------------------------------------------

I'll be choosing a winner for my 200+ Followers Stamp Giveaway tonight at 9:00 p.m.
Yippie!

Simple Holiday Placecards

12

Wednesday, November 17, 2010

If you're sick of me blabbering on about stamps and craft punches: STOP.READING.NOW.

Otherwise, here are a few more simple ideas for dressing up your holiday table.

Scented Version

Wrap some pretty ribbon around a bundle of cinnamon sticks and add a personalized, stamped name tag.


Natural-Look Version

Wrap some twine around a straight-edged, glass candle holder and add a personalized, stamped name tag.


Pretty, White Version

Wrap some pretty ribbon and tie a bow around a curvy, glass candle holder and add a personalized, stamped name tag.


Notice how all of them said "add a personalized, stamped name tag"? Yeah, I'm pretty much obsessed with stamping and punching things. (Craft punching, not violent punching.)

Plus these placecards are simple to make, inexpensive, and pretty darn cute. Can't go wrong with that.

Which version do you like best?

Note: Alex just came upstairs and told me that "tying a ribbon around a candle holder doesn't really count as being crafty." He is now getting the silent treatment + bread and butter for supper. ;)

--------------------------------------------------------------------------------------------------------

If you haven't had a chance to enter my 200+ follower giveaway, it's not too late. If you win then you can stamp everything in sight, too. You know you want to.


Linking to:

Make It Yours Day @ My Backyard Eden, Show and Tell @ Blue Cricket Design, Whatever Goes Wednesday @ Someday Crafts, Penny Pinching Party @ The Thrifty Home, Strut Your Stuff Thursday @ Somewhat Simple, Handmade Holiday @ Just a Girl, Hookin' Up @ House of Hepworths, Holiday Decorating and Project Ideas @ Whisperwood Cottage, Christmas Craft Link Party @ Centsational Girl
Related Posts Plugin for WordPress, Blogger...

Cozy.Cottage.Cute. All rights reserved © Blog Milk Design - Powered by Blogger