Vintage Ceiling Tile Mirror

8

Sunday, August 29, 2010


Are you sick of hearing about our powder room yet? No?!?! Perfect. Then this is the post for you.

'Member when I had such a hard time finding a mirror to fit in our powder room? I've whined about it quite a few times. 'Member when I drove to Simply Cottage in Bracebridge and found a vintage ceiling tile mirror that I wanted oh so badly? I complained about the hefty price tag here.

Well, when Alex and I stopped in there yesterday on our little road trip, I just had to show him the mirror. Of course I had the pouty lip goin' on. I think the store owner remembered me (and felt sorry for me) because she marked down the mirror by 50 bucks! It was still pretty darn expensive for a tiny mirror but this time I knew it was "the one".

This would be, oh, the fourth mirror we've purchased for the space. The first one was too modern-looking, the second one was too washed out-looking, the third one was too cheap-looking and the last one was/is........

.......perfect. Dreamy, actually. I love how it ties in some of the colours in the flooring. I love how it's got hints of green that tie in with the wallcolour. I love the chippy texture. I think I just love it in general.


So how many changes to the powder room have I made since our "big reveal" a few weeks ago? Um, four. I installed a brushed nickel curtain rod, added a white tie-up shade window treatment, swapped the cheap mirror with a vintage mirror, and switched a potted ivy for my tiny ceramic drawer. Alex says I'm not allowed to do anything else to the bathroom. I said okay. For now. :)

Followers and a Button and Features and a Tutorial and a Trip and Jars and a Tiny Drawer

10

Friday, August 27, 2010


How many random topics can I fit into one post? Hmmm, let's try 8. :)

New Followers

I've had some lovely folks sign on to be followers or "official readers" of this blog. I want to say HELLO and thank you so much. Every time I see that someone new has joined on, I still holler the news out to Alex. I'm sure he's starting to ignore my little outbursts by now but I still love to say and hear it out loud. It's so nice to know that there's someone out there!!! And it's you! If I met you in person I would take you out for a mint-chocolate chip ice-cream. It's still summer no matter what anyone says.

A Button!

This morning when I should have been vacuuming golden retriever furballs (the inlaws were on their way for a visit) I decided to try and make a blog button instead. Not a good use of cleaning time! I still have no idea what the button is for but everyone else seems to have one so I wanted one, too. I only needed a wee bit of help from the computer tech guy (Alex)(he's computer-savvy, too) at the very end. So now I have a button. If you click it, it will take you to my blog. Although if you're clicking it, you're already on my blog. Again, I have no idea what the button is for. It's cute though, and that's all that counts, right?

Features

I have been so very lucky to have a few of my projects featured on some very fun and crafty sites (The CSI Project, Fresh Crush, Remodelaholic, Domestically Speaking, Tatertots and Jello, The Virginia House, A Little Lovely, and Craft Gossip). I can't even tell you how thrilling it is for me. Two months ago I was too scared to try any projects on my own because I was always afraid that they wouldn't work out or that they would look ugly or "home-made". I think I've turned over a new leaf. Bring it on!!!!!
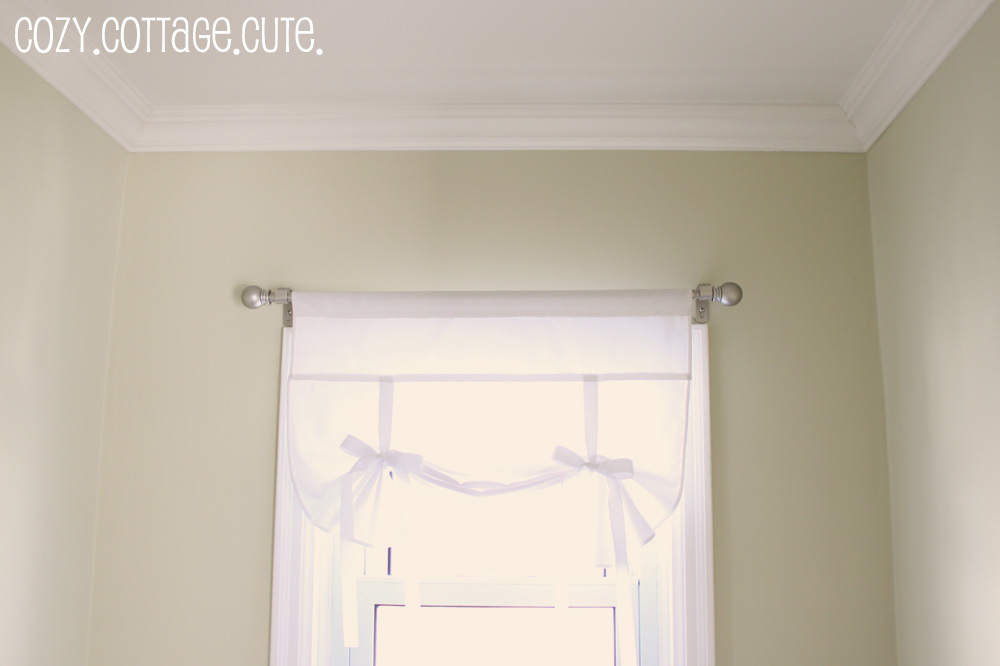
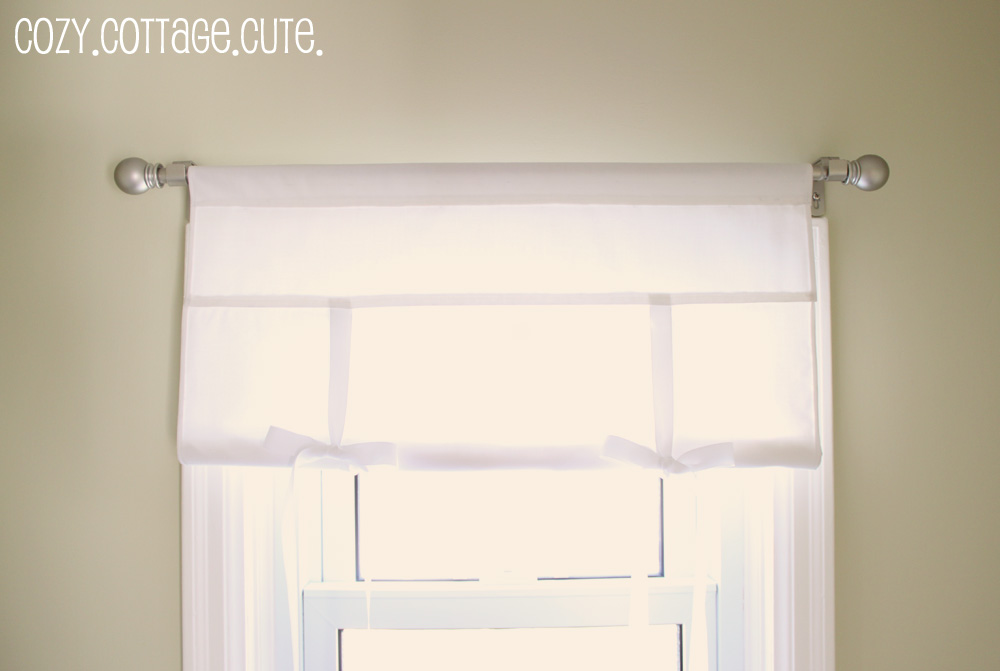
Tie-Up Shade Tutorial

So I think I need to find a "How to Write a Tutorial" tutorial. I started working on one for the tie-up shade that I made the other day. It is hard. One, I can barely even remember how the heck I made it, and two, I have no idea how to explain some of the sewing stuff. Is it called a hem or a seam or an edge?!? I have no idea!!! I'm working on it, though. You might read it and be like, "Wicked! I can totally make a tie-up shade now!" OR you might read it and be like, "This girl does everything @$$-backwards and her tutorial doesn't make any sense!" We'll see. Hopefully it'll be the first response. :S

Jar Photo

A reader asked me a very good question. She asked why I hadn't shared a photo of my nice clean pantry (which is really just a cupboard) with my new, labeled jars. Wellllllllllllll, it's because the jars were so cute that I put them on our IKEA kitchen cart instead.... where we can see them. Okay, that was a lie. I didn't share a picture because then you'd see our crusty linoleum kitchen floor from our original-but-not-in-a-good-way kitchen. Yeah. Our kitchen is oogly. Not even ugly, oogly. It also has cupboards on one side only. The other wall is completely bare (except for the ginormous fridge and our 20-year old dishwasher). Hence the IKEA cart. I'll show you a picture of the jars if you promise not to look at the icky floor:

A Tiny Drawer


When I was in teacher's college I had this little cupboard with 3 tiny ceramic drawers. One of the drawers broke in the move back home but I kept the remaining two. How sweet does one of them look with a little bit of greenery?


Trip

Alex surprised me this morning (best husband ever!) and told me that we are going on a little shopping road trip tomorrow. Woot woot! We haven't been on any of our road trips together since the spring so he decided to take me on a little end-of-summer date. Hello antique and cottage-y shops. I'm coming!!!!!!!!!!! Can't wait to share if I find anything cozy, cottage-y, or cute.

Get it? Hahaha, I'm a dork.

Have a great weekend! And THANK YOU SO MUCH for all of your sweet comments.

Pottery Barn Knock-Off Tie-Up Shade

39

Wednesday, August 25, 2010


A few weeks ago I did a reveal of our newly remodeled powder room. It was so close to being complete when we posted all of our photos....but it still lacked a cozy-it-up window treatment.

I've had my eye on the following tie-up shades from Pottery Barn for years. Years! My dream has always been to order five of them and use them to dress up our five large sunroom windows. Like the bathroom, they also need some window treatments to finish them off and make the room a bit cozier.

The problem with the Pottery Barn tie-up shades is that they are only available through catalog/internet ordering and of course they do not ship to Canada. Woe is me! All of the possible options for getting them here require way too much money in shippings costs.

So the other night I was checking out the amazing Pottery Barn Knock-Off projects at The CSI Project..... all forlorn because I didn't really have a project to enter. That's when the lightbulb went off.

Could I make a tie-up shade???

I decided to try and make a teeny, tiny shade for the bathroom and if it (gulp) turned out okay, then I could possibly make the ones for the sun-room later.

So I headed to Fabricland to see if I could find a similar fabric. The Pottery Barn shades are a blend of linen and cotton. Hmmm, I couldn't find any of that so I settled on some crisp, white cotton twill.

I looked at a few tutorials online which claimed that one shade took about an hour to make. THEY LIED!!!! I won't even admit how long it took me to make this little shade from start to finish. Let's just say an hour multiplied by a lot. Don't forget to add in a couple of mistakes and an iron burn on my knee. Tip: Don't iron on the floor in the dark.

I'm still kind of amazed that I actually did it. I sewed stuff!

Without further ado, here are the Pottery Barn Tie-Up Shades:


Here is our bathroom window before:


Here is our bathroom window after:


Rolled up all nice and neat:


Swoopy and droopy:


I think it adds just a little bit of cozy. Lovin' it.

P.S. I took photos as I went so if anyone is interested I could always post a tutorial on how I winged did it. Just let me know! Update: Tutorial can be found here.

P.S.S. It cost $12 for a metre and a half of fabric (with lots left over) and $4 for a huge roll of ribbon (lots left over as well). So much cheaper than the real thing!

P.S.S.S. I'm entering this project into the Pottery Barn Knock-Off Contest at The CSI Project (see button below).
Visit thecsiproject.com


Make it Yours @ My Backyard Eden

giveaways


BWS tips button


Show and Tell Green

Whatever Goes Wednesday @ Someday Crafts
Show and Tell Friday @ My Romantic Home
Frugal Friday @ The Shabby Nest

Labeled Jars

15

Monday, August 23, 2010


Last night I suffered from pantry envy. Well instead of just sitting around being glum about it, this morning I decided to just go out and get some of my own jars to store some baking goods. While my original plan was to get a whackload of them in varying sizes, the little voice in my head (probably Alex) told me not to go crazy with the spending.

After listening to the voice of nuisance reason, I decided to get 4 large jars, 2 medium jars, and 4 small jars. The large and medium ones I found at Wal-Mart and the small ones I found at our local dollar store. Score!

Then I wondered how I should label them. Vinyl? Tags? Stickers? I wandered the aisles of Michaels looking for inspiration but I couldn't seem to find any. The tags were too papery and the alphabet stickers were either too kiddish or too glittery. Finally I came across some Rub-On Transfer Letters. They were only $1.65 for a set so I figured I'd give it a try.


Plain glass jar and some rub-on transfer letters.
I threw a piece of tape on so that I'd apply the letters in a straight line.
Notice anything wrong with this picture?

What the heck was I doing!?!? They're called oats, not oatmeal. Duh!

Tied some twine into a bow around one of the small jars.
Braided some twine around another small jar.
Filled 'em up with some hazelnuts, almonds, raisins, and coconut.

Ah, now I feel better.
Now don't these tidy jars just make you want to bake something and make a huge mess?

Linking to:


I Have Pantry Envy

15

Sunday, August 22, 2010


Tonight while I was simultaneously eating my wholesome dinner (a grilled cheese sandwich) and baking blueberry bran muffins (best recipe ever) I decided it was about time to clean out the walk-in pantry. It's on THE LIST. When I say walk-in pantry I really mean the tiny cupboard over the stove that was stuffed to overflowing with baking supplies, spices, and random cooking sauces. I have been putting this off for a long time. So long, in fact, that I just happened to find a box of Betty Crocker cake mix from 2006. Don't worry though, I'll use it up to bake cupcakes for my class if they are bad throw it out. I also noticed that I seem to like things in pairs, threes, fours, or sixes. Two canisters of cocoa, three bags of icing sugar, three boxes of baking soda, three bottles of corn syrup, four boxes of semi-sweet chocolate, six containers of cupcake liners, etc. etc. etc. Right now you might be thinking that I'm such a good planner to purchase all of these supplies ahead of time, except they were, um, all open. At the same time.

For some reason I found it depressing motivating to stop half-way through cleaning/organizing my cupboards to google pictures of other people's dreamy pantries. Here are some photos that make hearts come out of my eyes.


Love: scalloped trimwork, teeny jars, bright colour.

Photo: Country Living

Love: white, white, white.
Photo: Country Living

Full length double doors would make it soooo easy to find your chocolate chips oatmeal.
Photo: Better Homes and Gardens

Love: wall colour, wall decals, old crates, labeled jars.
Photo: House of Smiths


Love: huge baskets, wide shelves, so organized!
Photo: Unknown


Love: beadboard, aprons, baskets, chicken wire.
Photo: Unknown


Love: glass jars, frosted glass, double doors.
Photo: Unknown

I have pantry envy. What's yours like? Am I the only one whose pantry gets out of control?!?!

Breakfast Room Gets Destroyed

3

Saturday, August 21, 2010


Right now we have too many two projects on the go: the deck and the breakfast room. The breakfast room leads out onto the deck so it's kinda fitting that we're working on both at the same time. Or we just really like having tools strewn around the whole house and a combination of drywall dust and sawdust on everything we own.

Actually, it was my idea to start working on the breakfast room (solo) while Alex worked on the deck. That way we could get two projects done at the same time. Brilliant, right?

Um, not really. I kind of forgot that Alex needs to do a lot of work on my project like changing the electrical outlets, installing trim, cutting baseboards, patching the cracks in the ceilings, etc. Whoops.

So today we worked on the room together. But please explain to me how "working on a room" seems to mean destroying the heck out of it?!?

In case you don't believe me, here are some pictures to prove it:

Alex scrapes plaster where the walls have cracked. I try out paint colours.


Alex chops a hole in the side of the house with a scary chainsaw to make room for this door. I go out.


Alex gets paint chips in his eyes from scraping the ceiling. I debate whether or not to spraypaint the old light fixture.

Alex patches all of the cracks. I sweep.

Man, oh man. My project is hard work!

Side Table Makeover - Before and After

67

Wednesday, August 18, 2010

Goodbye hideous knotty pine side table that I've hated had forever
and HELLO new white side table that I love so much I want to marry.

I'll let the pictures do the talking. Well, some of the talking.

Here it is, all knotty and ugly. I wrote more about it here.

I dug around in the basement until I found some shellac-based primer
(important with raw pine so that the knots don't bleed through).
I also found some leftover Simply White by Benjamin Moore to use on top.

I used a 40% off Michael's coupon and the rest of my birthday gift card to get this wickedly awesome craft knife. Alex said I could use his exacto knife but it was dirty and had boy germs on it.


I created the text/numbers I wanted in Word and printed them on regular white paper. I placed the page behind a blank stencil sheet and used my craft knife to cut out each letter/number.

Tip: Don't try to do this at 11:00 at night when it's dark and you are sleepy/grumpy. Trust me, you'll get frustrated!

Look at me, I'm stencilling (badly) for the very first time!

Green side of table.

Grey side of table.

Now I can do a switcheroo whenever the mood strikes!


Might as well try it out in it's old spot. Wait a minute, now it's cute! Yeah!

Can't forget the knickknacks.
Confession: That frame has been empty for oh, about 2 years.
Better late than never to throw a wedding pic in there.

Now let's all pretend that the number 23 has some special significance.
Um, it doesn't. It just looked pretty.


And last but not least the before-and-after shot.

Why oh why did I wait so long to do this?!?

Which version do you like better: pine (trick question), with green lettering, or with grey lettering?

Check out these other super-inspiring projects:

Make it Yours Day @ My Backyard Eden
Power of Paint @ Domestically Speaking
Transformation Thursday @ The Shabby Chic Cottage
Strut Your Stuff Thursday @ Somewhat Simple
We Can Do It Cheaper @ The Virginia House
Upcycled Awesome @ The T-Shirt Diaries
Furniture Feature Friday @ Mustard Seed Creations
Show and Tell Friday @ My Romantic Home
Remodelaholics Anonymous Friday @ Remodelaholic
Frugal Friday @ The Shabby Nest
Fresh Coat Fridays @ In the Fun Lane
Everything But The Kitchen Sink @ A Little Knick Knack
Saturday Soiree @ A Little Lovely
Weekend Wrap-Up Party @ Tatertots and Jello
Saturday Night Special @ Funky Junk Interiors

Related Posts Plugin for WordPress, Blogger...

Cozy.Cottage.Cute. All rights reserved © Blog Milk Design - Powered by Blogger