


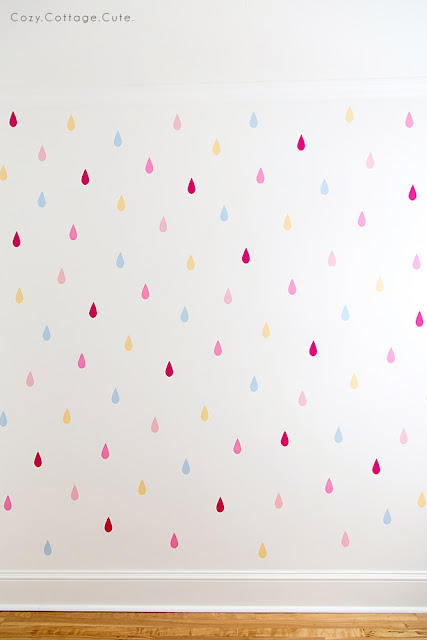
I am so excited to share my latest little project with you - a colorful raindrop accent wall in Winnie's nursery!
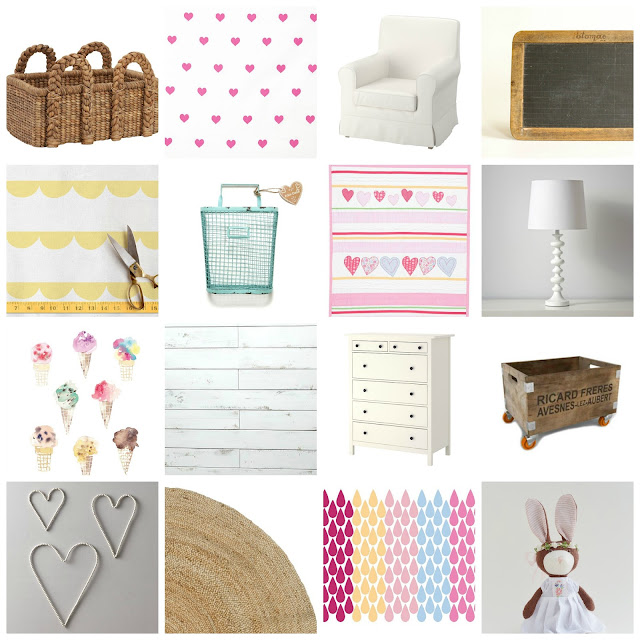
A few weeks ago I shared my general plan for the room:
At the time I had just placed a custom order from the Etsy shop 'Leen the Graphics Queen' for some colorful vinyl raindrops. I really wanted to use her shop since I had heard great reviews. At the time they didn't have any raindrop wall decals so I sent an inquiry with the following inspiration picture and a size request of 3" x 1.5" for each raindrop. Whaddayaknow she whipped those up in no time flat and they were perfect!
 |
| Raindrop Inspiration Picture - The Lovely Wall Co. |
The first thing I did when I received the wall decals was to cut them all out. Each of the five colors came on a solid sheet. I knew I wanted to play around with the pattern / spacing of the raindrops before committing for good. Once they were all cut out I taped up a test area that I shared on Instagram.

My sometimes helpful husband (okay he was a lot helpful this time) came in and took a look. He did the math and figured out that if I spaced the raindrops as close together as they were in the above picture, that I wouldn't have enough! I ordered 125 raindrops - 25 of each color. So, I started again trying to fit about one and a half raindrops per square foot. I got to work taping them up using a random pattern and random spacing.
Here is how the wall looked before I got started.


I started (the second time) in the upper left corner and worked my way down and across.


Every once in awhile I would take a step back to see how it looked. Sometimes I had to tweak the spacing between the raindrops as I kept making the gaps smaller as I went along. Whoopsie!

Alex was a dear and entertained the kiddos while I worked. Drinking coffee and taping up cute raindrops is great way to spend a Sunday afternoon by the way. After a few hours of taping, tweaking, peeling, and then sticking..... here is how the completed wall looks!


I kind of love it.

The room is really, really tiny. I had to smoosh myself against the back of the opposite wall and use my wide angle lens to get the whole wall in one picture.

I need to stop looking at these pictures though. I keep seeing little areas that need additional tweaking. A color switch here, an inch to the left there. I really need to make a limit for myself - only five more adjustments allowed! Dear OCD: Simmer down - it's supposed to be random!
I was hoping for a light, airy, whimsical, cottage vibe in this room. I think I'm headed in the right direction. What do you think?!?!?
:)
P.S. I really did love the stencil that I did on the same wall a few years ago when it was Cooper's nursery. However, Alex didn't love sanding the wall for six hours before repainting. I think both of us are very happy that this little accent wall can be changed up a little more easily this time!
P.P.S. I had ONE raindrop left. How's that for luck!

Alex was a dear and entertained the kiddos while I worked. Drinking coffee and taping up cute raindrops is great way to spend a Sunday afternoon by the way. After a few hours of taping, tweaking, peeling, and then sticking..... here is how the completed wall looks!


I kind of love it.


The room is really, really tiny. I had to smoosh myself against the back of the opposite wall and use my wide angle lens to get the whole wall in one picture.

I need to stop looking at these pictures though. I keep seeing little areas that need additional tweaking. A color switch here, an inch to the left there. I really need to make a limit for myself - only five more adjustments allowed! Dear OCD: Simmer down - it's supposed to be random!
I was hoping for a light, airy, whimsical, cottage vibe in this room. I think I'm headed in the right direction. What do you think?!?!?
:)
P.S. I really did love the stencil that I did on the same wall a few years ago when it was Cooper's nursery. However, Alex didn't love sanding the wall for six hours before repainting. I think both of us are very happy that this little accent wall can be changed up a little more easily this time!
P.P.S. I had ONE raindrop left. How's that for luck!
Sharing Here:
Inspire My Monday @ Sand and Sisal
Made By You Monday @ Skip to My Lou
Tutorials and Tips Link Party @ Home Stories A to Z
Silver Pennies Sunday Link Party @ Silver Pennies
Made By You Monday @ Skip to My Lou
Tutorials and Tips Link Party @ Home Stories A to Z
Silver Pennies Sunday Link Party @ Silver Pennies


That's adorable. Great job :)
ReplyDeleteThank you, Elaine! I finally feel like I'm on a roll in there..... :)
DeleteLove the wall! Decals are so much fun. I did some giant polka dots in our toyroom and it just makes the room instantly happy. Visiting from Tutorials & Tips party.
ReplyDeleteGiant polka dots sound awesome. :) Thank you so much for stopping by!
DeleteI love them. They are whimsical and fun.
ReplyDeleteYay! Thanks Andrea!
DeleteIt's beautiful. I would be picking at the spacing and color set as well. As an outsider it is perfection--such a pretty palette. When I make sensory ribbon blankets I rearrange the ribbons for more of a balance color and print wise. I am not a freak about it but definitely play around sometimes.;)
ReplyDeleteThank you so much, and your blankets sound really neat! :)
DeleteI love these! So, so cute!
ReplyDeleteThank you, Mary!
DeleteOh My Gosh Sarah!! I love, love, love it!! This has to be the cutest wall ever...is it weird that I could sleep in there and be happy? ;) Now you need to figure out how to diy an umbrella lamp...or a rubber boot lamp! ;) Just so darn cute!
ReplyDeleteGood thing you had the math help...I could have never figured that out on my own! And I hear you about the OCD visual but once you get the furniture/décor in there it will visually block any of that, that only you see! ;)
Kimberley
Nicest comments ever, Kimberley! Thank youuuuuuuuuuuuuu!
DeleteYou've done a fantastic job and the colours are perfect. Can't wait to see all the furniture in place. By the way, your paint work is immaculate - are the ceilings the same colour as the walls?
ReplyDeleteYes! The entire room is Simply White by Benjamin Moore. The trim is painted with semi-gloss and the walls are an eggshell finish.
Delete:)
SO cute!! Our bedrooms are tiny, too, so I know the pain of smooshing yourself against the wall to get a decent picture, haha.
ReplyDeleteI always wonder what the neighbors think I'm doing if they can see me through the window, lol!
DeleteSarah,
ReplyDeleteLooks absolutely adorable! All perfectly placed...love it!
Linda
mysewwhatblog
So nice of you to say that they are perfectly placed. The hubs just came in the room earlier tonight and said one side is way closer together than the other side. Boys!?!?! ;)
DeleteVery sweet. Good job indeed.
ReplyDeleteLove this! Will be using this as inspiration for my daughter's big girl room. Makes me think of this nursery a little which I love too: http://thesweetestdigs.com/mayas-bright-and-cheerful-diy-nursery/. Can't wait to see more!
ReplyDeleteThank you Erin! I checked out the link and the room you shared is pretty adorable. Ice-cream cone wall decals are the bomb.com. How did I not think of that! :)
DeleteAbsolutely Adorable, Love it
ReplyDeleteThank you Melissa!
DeleteHow cute is that!! Who would have thought to do that with raindrops? Awesome idea! Great, now I have that song stuck in my head "Raindrops keep falling on my head" Lol
ReplyDeleteKelly
Lol!
DeleteRain drop wall envy💕
ReplyDeleteThis made me laugh out loud. Thank you!
DeleteRain drop wall envy❣
ReplyDeleteThat is so cute, fresh, and fun! And how smart to think of taping them in place first - I would have thought of it after it was too late!
ReplyDeleteSuch a cute idea, I hope there's a sun on the opposite wall though!
ReplyDeleteSoooo adorable!!
ReplyDeleteNow that I have seen this adorable wall again, I am thinking of doing something similar in my craft room. Hmmm...YOU ARE A SUPER AWESOME INSPIRERER.( I think I just made up a word)
ReplyDeleteSteph
WOW! It looks very nice and simple. I really like it and looking forward to adapt such wall designing idea to design my room wall.
ReplyDeleteI agree..Love the colorful rain drop! so yay <3
DeleteJust wanted to tell you how much I love your blog! I LOVE your style and the fact that you are on a budget inspires me. I have copied your shutters, your entryway bench from Home Goods, and I now grow pretty hydrangeas all thanks to your inspiration ! You have the cutest babies and I enjoy seeing pictures of them. Thank you for sharing your life with us❤️
ReplyDeleteIts Great! I loved the idea of colorful and black raindrops. I have never seen this kind of thing anywhere. I would love to do this kind of thing in my room.
ReplyDeleteI miss hearing about your home and life! Hope that all are well......
ReplyDeleteI miss them too. Also hope all is well and absence is just busy working mum reasons.
ReplyDeleteYour arts work looks phenomenal. Beautiful
ReplyDeleteSarah come back to us! We would love to see Winnies nursery before she graduates high school! :) Just kidding of course!
ReplyDeleteJust found your site and it's so cute! Hope to hear more from you!
ReplyDeleteHere's what we've been working on lately:
https://wanderlustingbydesign.com/2016/09/29/making-an-eh-door-the-door/