


I am so, so excited that I finally tackled and finished this project. It's been on my to-do list since I first saw my original inspiration pictures on Pinterest. Here are the dreamy photos that inspired this project to begin with. Totally not my idea. This is me being a big ol' copycat.
 |
| Image: Pinterest Original Source: Silhouette America Blog |
 |
| Image: Pinterest Original Source: Dear Lillie |
I knew I wanted some chocolate-y brown wood in Little Ninja's nursery since everything else is so light and white. I love the faded stripes in the first photo and love the scale and wood-tone of the second photo.
So, here's a step-by-step tutorial on how I made my own version of the two.
DIY Growth Chart Tutorial
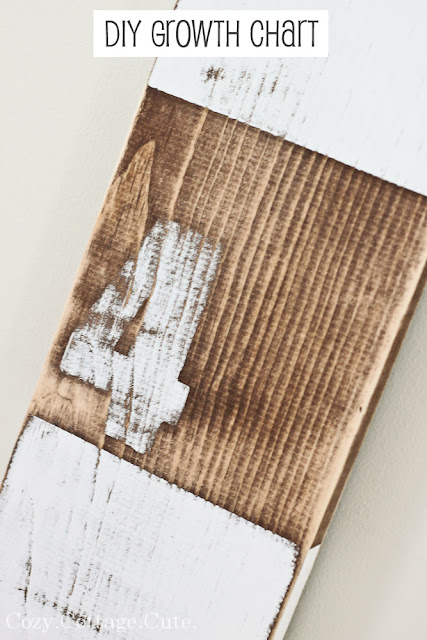
First, I purchased a large pine board from Lowe's. I chose the nicer looking wood that has less knot-holes. I didn't want them bleeding through under my purty white stripes. I also dug out some wood stain that I already had from a previous project. I used Varathane Gel Stain in Special Walnut:
 |
| Supplies: Pine board, foam roller, gel stain. |
Using a foam brush, I applied two coats of stain on all sides of the pine board. I waited a few hours in between coats and made sure to apply the stain outside where there was lots of ventilation. Stain = stinky:
 |
| After two coats of Special Walnut stain. |
I found some large number stickers at Michael's that I thought would be super easy to use rather than making my own number stencils (like I've done in the past). I also don't have a Silhouette machine or anything fancy. Stickers it would be:
 |
| Large number stickers from Michael's. |
I tinkered around with the measuring tape for a while trying to figure out the measurements. It helped to lay the stickers out on the wood to visualize how it might look:
 |
| Figuring out the measurements. |
Once I decided where everything would go, I used a square thingy from the basement to make sure the lines for my stripes were nice and straight:
 |
| Marking the lines for my stripes. |
Next I taped off where my stripes would go, and also taped off a section at top and bottom where I wanted Alex to trim the board with his table saw:
 |
| Taping the stripes. |
Once my board was trimmed I painted some 6-inch stripes using a small paintbrush and some flat white paint that I had leftover from a previous project. I applied two coats of paint for the stripes:
 |
| Painting the stripes. |
Next I removed all of the tape:
 |
| After removing the tape. |
I wanted my numbers to be white, so I made sure to apply the background of each sticker to the unpainted wood sections:
 |
| Adding the stickers. |
After making sure the stickers were adhered really well, I painted the inside of each number with a small craft brush. I ended up needing three coats of paint for inside each number:
 |
| Painting the numbers. |
Once the paint was dry to the touch, I peeled off each sticker, and was left with crisp white numbers:
 |
| After removing the stickers. |
My stripes and numbers didn't stay crisp-looking for long. I let everything dry overnight and then used an electric sander and 100-grit sandpaper to sand the living daylights out of 'em:
 |
| After sanding with 100-grit sandpaper and electric sander. |
I wanted the board to look really worn and faded and old since I have some really crisp and new elements in the nursery. I wanted quite a bit of contrast.
So...... here are some photos of the finished project, although again I'm trying not to show you too much of the room just yet. :)


Pinterest challenge - done!
I think I might be smitten.
We installed the growth chart behind the door to the room since that section of wall was kind of bare-looking when the door was closed.
{Note: I decided not to add any ruler lines because I like how simple it looks and didn't want to make it too busy looking.}
Now I only have two more little things to tweak this weekend before I show you the whole room on Monday.
Weeeeeeeeeee!
P.S. If I missed any steps or if you have a question about this project please feel free to leave me a note in the comments section. :)
P.S.S. To see the growth chart in the finished room, click here.
Sharing Here:
Frugal Friday @ The Shabby Nest, DIY Link Party @ AKA Design, Flaunt it Friday @ Chic on a Shoestring Decorating, Saturday Nite Special @ Funky Junk Interiors, DIY Project Parade @ The DIY Show-Off, Nifty Thrifty Tuesday @ Coastal Charm, The Creative Spark @ Clean & Scentsible


I really like the way your growth chart came out and also looking forward to seeing the nursery soon!
ReplyDeleteThanks so much, Diane!
DeleteYet another gorgeous nursery project, Sarah! Little Ninja is going to have some wonderfully decked out digs :) I loved this when I first saw it on the Silhouette Blog and your interpretation of it is spot on. The distressing just puts it over the top!
ReplyDeleteIt won't be long now ;)
At first I thought I went a little too crazy with the distressing but now I think it's perfect.
DeleteThanks so much for your comments, and you're right... not long now!!! Ah!
It is adorable! What a sweet nursery it is, I can just imagine it in my mind, so I can't wait to see it on Monday! What a lucky baby he is!
ReplyDeleteThank you!!!
DeleteI'm crossing my fingers that he likes his room. Wait a minute...... ;)
That is absolutely precious! I've pinned those same measuring charts, too! I believe I'll now have the guts to do this project one day, and I'll probably just follow your tutorial! Great ideas!
ReplyDeleteThanks so much Brenna!
DeleteGreat idea instead of writing on the wall! Looks like it was made especially for the room.
ReplyDeleteThank you!!! :) :) :)
DeleteOh man! Now I'm so jealous and pissed and in awe all at the same time!!! This is AWESOME!! I've been wanting to do some sort of growth chart for forever, but I can't make up my mind about what kind I want...something whimsical painted right on the wall, love those rulers from Dear Lillie, a hang-down chart...I'm so indecisive. So now my kid is like 34 inches and I got nothing:( I'm so glad you found your inspiration and got it done, this is going to be such a fun keepsake. Do you know yet how you are going to mark off how tall is he? Ok, now I'm pinning this to my "someday" folder! Can't believe you are getting all this done being this prego!!! How many days/weeks do you have left? Good luck and best wishes in case he decides to come early and I don't talk to you before then:)
ReplyDeleteYour comments are always the funniest, I swear!
DeleteI can't believe I'm getting all of this done, either. If it makes you feel better I look really awkward and it takes me about quadruple the normal amount of time to get anything done. Especially painting that board all hunched over on the floor. :S
To mark the heights I'm thinking I might put little push pins in the board with little tags of the age/date.... I haven't decided yet. Hopefully he'll be tiny so I won't have to figure that out just yet. Hee hee.
And.... officially only 5 days left until the due date. Thanks for the good luck. I'm freaking out! Every little pain or ache I think it's "happening". Haha!
:)
that's just so smart , we had to leave our growth markings behind at the old house . wish I had done something like this.
ReplyDeleteThanks Chris!!
DeleteI think I'm going to have to do one of these too! My guy is already 2 1/2 but I want to start keeping track. We're military so this would be great so I can take with me wherever we move :) Turned out so cute! I wish I would have found your blog years ago before mine was born and would have done a few more diy projects! Can't wait until Monday!!! <3
ReplyDeleteIt's not too late. Go for it!!!! I think it's the perfect idea for a family on the move.
Delete:)
That looks great. I totally want to make one when I have kids. We had to take a piece of the wall with us when we moved as a kid so this makes much more sense.
ReplyDeleteWe had to leave ours behind at our old house 'cause it was a rental. So sad!
DeleteThanks for your comments. :)
The cutest one I've seen yet! Great job!
ReplyDeleteAwww, Lisa...... you know just what to say. Hee hee.
DeleteThis is so cute, love the rustic look!
ReplyDeleteThank you!!!!
DeleteAre you freakin' kidding me Sarah?!?!? This is awesome... I love this!!! And I am pinning it.. and I am eventually copying you- haha!!! This would be perfect in my twins' room. I am going to attempt to use your tut for the tie up curtains next weekend, I'll let ya know how it goes.
ReplyDeleteFYI... I pinned and its blowing up Pinterest
DeleteOoooh, I'm so excited that you're gonna make a growth chart AND the tie-up curtains. That sewing tutorial was the worst ever to write so it makes me happy when people actually use it. Haha!
DeleteThanks for your sweet comments and in response to your pin on Pinterest.... LIKE LIKE LIKE LIKE LIKE LIKE LIKE LIKE LIKE LIKE! :)
This is LOVELY! You did such a great job... loving the white with the dark stained wood. Seriously excellent job!
ReplyDeleteblessings to you,
lauren @www.SummitStreetJoy.com
Thanks so much Lauren!
DeleteThis looks fabulous! Thanks for sharing...I might even have a go at this for my kid's room, if you don't mind I copy?! This may seem like a dumb question, but I gotta ask...would you mind sharing how you 'installed' this to your wall? I can only think about finding a stud and using long screws. If this is how you did it, did you wood-fill the screw holes afterwards and re-stain/paint them, or did you just leave it?
ReplyDeleteOf course I don't mind if you copy.... I only made one 'cause I copied someone else's idea!!!
Delete:)
I did the super-easy install. I screwed in a triangle-shaped picture hanger thing to the back of the board and hung it up on a nail in the wall. We have super thick sturdy walls so if things aren't too heavy we can get away without using screws/anchors.
Now that I think about it, screwing it into the wall from the front might have been a good idea to keep it steady. Ah well... next time. ;)
This is by far my favorite project yet. If only we had children! Definitely putting this on my future to do list.
ReplyDeleteI love your growth chart! I don't have a Cricut either, so I'm like you and get creative when I want to paint letters and/or numbers on something. So just out of curiosity, will you be marking directly on the board when little Ninja is measured?
ReplyDeleteCan't wait to see the whole room reveal!
Tania
Hi Sarah,
ReplyDeleteI love your rustic growth chart :)
Dee
So cute. I'm going to make one of these this week! just decided.
ReplyDeleteSo cute! I think all of your nursery projects have just been great. (my fav is the numbered chest of drawers) Your little baby (ninja) is so lucky to have such a talented and creative Mom! Looking forward to seeing the whole nursery...
ReplyDeleteLayne
Oh this turned out adorable. Really you did sucg an awesome job. I am really glad to have discovered your blog.
ReplyDeleteAh-mahzing (said a la Penny from Happy Endings)
ReplyDeleteI love love love it! And I like how you are anticipating Little Ninja is going to become Big Ninja and go up above 6ft tall! Woo hoo!
Can't wait to see the rest of the nursery. I think the little guy is going to have the coolest digs in town!
Claire
Very cute. My daughter would love something like this in her room.
ReplyDeleteThat is adorable!
ReplyDeleteThis is painfully adorable! Love it!!
ReplyDeleteI love this!
ReplyDeleteLOVE this!! You did a fabulous job on it!! Can't wait to see the big room reveal!! I'm sure the amount of adorable in this nursery is going to kill me!!
ReplyDeleteThat turned out wonderful! Visiting from NTT
ReplyDeleteLooks great...love the 2 tone look :) Laurel
ReplyDeleteSquare thingy had me laughing ... great job and now I think I will have to copy yours :)
ReplyDeletebj
Awesome!
ReplyDeleteGirl...this turned out incredible! LOVE LOVE it!! Pat yourself on the back! :)
ReplyDeleteBonnie @ uncommon
www.uncommondesignsonline.com
I love it! Are you actually going to mark his growth on it or is it just for looks?
ReplyDeleteThis is absolutely adorable. I love it and I love your blog...so glad I stumbled across it. I'm your newest follower.
ReplyDeleteSarah, I LOVE your version, as I love all things rustic! I believe I'm smitten as well. Bravo!
ReplyDelete<3 Christina
http://igottacreate.blogspot.com
Sarah this is so clever, I love it. Stopping over from your feature at DIY, and I pinned it as well so I can remember to make one for my daughter in law.
ReplyDelete~Bliss~
This is fabulous! Just love the stickers as stencils idea so much that I pinned it!
ReplyDelete:)
Linda
Love this idea! So rustic and chic!
ReplyDeleteI LOVE this. I think this would be a perfect addition to an awkward blank space in my home. My daughter turns 1 in August and I would love to get this up in time to record her height on her birthday. Also, I love that it is something you can take with you or move without any loss of the heights. Thank you for sharing.
ReplyDeleteThis is so beautiful! I love it! :)
ReplyDeleteLove it. and I love your very technical instructions :). Happy Mother's Day!
ReplyDelete-Liz
I am super psyched that I found your blog. Not only do I love the look, but your latest project is a must do for me. I just transferred my daughter's growth chart marks from the fridge (which we sold) to a scrap piece of wood from the redwood fence. The wood is weathered and I just couldn't figure out what to do with it...you have inspired me. Thanks so much...I'm a new follower. Stop by anytime, Lori
ReplyDeleteHow hight off the ground did you hang yours?
ReplyDeleteI made sure to hang it so that the one foot line/stripe (near the bottom) was exactly one foot off of the ground. That way the #2 is exactly two feet off of the ground, etc.
DeleteDoes that make sense? Hope so!
Great project! I loved it so much I had to do one myself! I have linked to your site on my tutorial. Thanks for the inspiration and congratulations!
ReplyDeletehttp://threechicksoneegg.blogspot.ca/2012/04/diy-growth-chart.html
I am SO in love with this, and I am certainly going to copycat it! I am also featuring this on my [so cheap, so easy] series tomorrow. I will be linking back to your original post. Off to check out the completed nursery!
ReplyDeleteJamie
I love the way your's came out. Thank you so much for sharing. I can't wait to make one!
ReplyDeleteYour growth chart is beautiful, great tutorial too! I have this linked to my ruler growth charts roundup post as well today, for inspiration!
ReplyDeleteI just found you through Inspire Me Heather! I love this version of a growth chart ~ it looks so great with the stain a major distressing!
ReplyDeleteCan I ask, what's the size of your finished board?
ReplyDeleteAck! I must've forgotten to respond to this question. Sorry about that!
DeleteThe finished board is 5 1/2 feet tall and is mounted a foot off of the ground.
:)
i am completely in love with this growth chart. googled tutorial and came across your blog. new follower ;)
ReplyDeletehop on over and check my blog out ;) im hosting a balance bike giveaway this week :)
http://eandnreyes.blogspot.com/2012/09/strider-balance-bike-win-it.html
I love this idea! I just used you as inspiration for creating my own version. Thanks for sharing!
ReplyDeletehttp://katiecraftnight.blogspot.com/2012/10/fall-pinterest-challenge-growth-chart.html
What a beautiful growth chart. I love this idea and can't wait to make one, It would be a lovely gift for a friend or first birthday. Thanks for sharing!
ReplyDeleteD
Wow! Stumbled across your blog and love it, especially love how your DIY growth chart turned out! Beautiful technique and lovely addition to a baby nursery!
ReplyDeleteA few months back I asked my husband to help me make one for our boys and we had fun preparing the board, but got stuck on creating a neat, professional way to put on numbers and tick marks. We tried numerous methods, and weren't happy with any of them, so decided to design a DIY vinyl decal that you can just transfer onto the board and were finally happy with it!
Since then, knowing how popular this project is, we actually opened a shop on Etsy to sell the decals for other DIY-ers who wanted to make a board but didn't have the creativity or time to hand draw out or stencil numbers and tick marks. If you'd like to take a look, or recommend the shop to others in your post as an option who might be frustrated by the same step, it's: www.etsy.com/shop/LittleAcornsByRo
Maybe it will be a help to others out there!
Thanks and best wishes!
Ro
I love this! Can ask what size numbers you used? I have 3" but I think I would like them larger.
ReplyDeleteHi and thank you. :)
DeleteThe numbers I used were 4" high. Hope that helps and good luck with your project!
Did you just measure 6 inch chunks for the tape? I'm math challenged. :) And in the process of making this right now!
ReplyDeleteYes, each chunk is 6 inches. The white painted stripes are 6 inches and the plain wood sections are 6 inches as well.
Delete:)
Hope that helps...
Great tutorial, i will be using this when i do a chart for a friend of mine. thanks!
ReplyDeleteI LOVE this! My little guy just turned one and I can't wait to copy your chart this week. We also have a calm mostly white nursery so I'm looking forward to the contrast. Thanks for sharing the instructions.
ReplyDeleteHi!
ReplyDeleteI am just wondering how you attached it to the wall?
I added a simple hanging bracket to the top and just used a nail in the wall. However, once Cooper was mobile I added some command strips to the bottom so that it stayed put. :)
Deleteperfect. heart.
ReplyDeleteIn the works currently! I have had a board in my garage for the past 3 years for a growth chart, but couldn't seem to find one I loved until now. Thanks for sharing!! I would love to see how you marked different heights on it.
ReplyDeleteI followed your tutorial a couple of years ago before my little guy was born, and have yet to mark it up because I can't figure out a nice way to mark it! Please share how you marked the heights - I'm sure it's ingenious and pretty, and I need to copy it ;)
ReplyDelete