


I'm a day past my self-imposed deadline but that's okay because the dresser for Little Ninja's bedroom is finally, finally, finally done.
Happy dance!
I feel so relieved that little dude now has a stash for all of his mini hoodies. (He only has one hoodie so far but I've still got a few weeks to build a collection.) ;)
Back to the dresser.
I originally bought the dresser almost three years ago at the Christie Lake Antique Show. It was old, it was crusty, it was only $90. I loved the size, shape, and style so I didn't think twice about bringing it home. Except it sat in our basement for way too long gathering dust and taking up space. See, it had quite a few layers of old paint already, all crackled (which I kind of like) but the base colour was a hideous hunter green which just had to go.
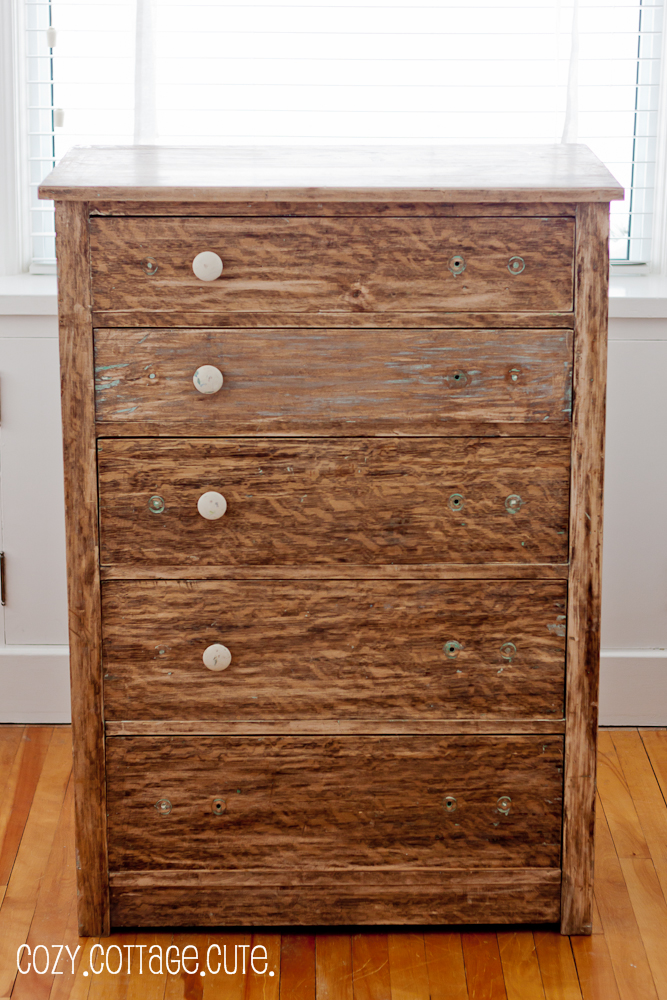
A few weeks ago my awesome dad offered to strip the paint off for me so that I could finally get it ready for the baby's room. Here's a photo of the dresser after all the paint was stripped off:


I knew I wanted the dresser to be white, but I also wanted to add a little bit of interest and depth so I did a two-colour paint finish. I'll explain in the step-by-step tutorial below:
1. Remove Old Paint
We did this step for a few reasons although you don't always have to strip the old paint off before repainting old furniture. There were too many layers of paint, there were deep cracks in the top paint layer, and I wanted to get rid of any yucky old paint in case Little Ninja decides to chew on this dresser at any point in the future. My dad used a heat gun and a metal scraper to remove all of the old paint layers. He did this in the garage with the doors open for ventilation.
2. Sand
Before priming the dresser, I gave the whole dresser a very light sanding by hand with some fine grit sand paper (150 grit). I then wiped it down with a damp cloth.
3. Prime
I usually prime furniture with Benjamin Moore's Fresh Start Primer, but I ran out. On a routine trip to Home Depot I picked up a different brand instead. It worked fine.
4. Paint With Base Coat Colour
I chose to use grey as the base colour for the dresser. This is the colour that I wanted to show through underneath the white after sanding and distressing. I chose a very light grey (leftover 1/2 tint Grey Owl just because I had a bunch leftover from painting the living room / dining room). It is a soft, neutral colour that I know will go just about anywhere in the house. I painted this coat with a brush for all of the crevices and a foam roller for the flat surfaces.
5. Paint with Top Coat Colour x 1
Once the grey paint coat was dry, I painted directly over it with my top colour: Cloud White by Benjamin Moore. I chose an eggshell finish to make sure it was a bit more durable (I still don't like using pearl or semi-gloss paint on furniture even though that's what the paint store always recommends).
6. Paint with Top Coat Colour x 2
Once the first coat of white was dry, I painted a second coat of white on top. It just looked better that way.
7. Sanding & Distressing
When it was time to scuff up the freshly painted dresser, I went back and forth between using an electric sander and sanding by hand with 100-grit sandpaper. The sander worked really well on the top of the dresser and the drawer fronts. The side panels were so small that I used the sander and a sanding block by hand.
8. Add Hardware
The dresser already had holes pre-drilled for drawer pulls / handles. I found some 3" industrial-looking pulls at Home Depot for about $5 apiece. Ouch, I know. Don't tell anyone that I spent 50 bones just on the handles. I also wanted to add a little something fun since the dresser would be going in the nursery. I really like the look of numbers on dresser drawers but I decided against stenciling numbers directly on the drawers. Instead, I found some adorable "house numbers" at one of our local hardware stores (Canadian Tire). They have a stick-on backing so they can be easily removed if I change my mind or decide to use this dresser somewhere else one day.
And, the best part. Photos!
 |
| Can you see the grey paint showing through? |
 |
| Brushed nickel 3-d numbers. So cute! |
 |
| Boyish looking drawer pulls. |
 |
| Hopefully Dude'll learn how to count to five after staring at this dresser all the time. |
 |
| The after picture. |
So, what do you think? Do you like it, do you like it, do you like it? It definitely fits in with the vibe I was going for in the room. Old / new / modern / country / industrial / fun. Uhhhhh, does that make sense?
And here's a before and after comparison shot since those are always super fun:

Sharing Here:
Metamorphosis Monday @ Between Naps on the Porch, Craftomaniac Monday @ CraftO'Maniac, Creative Bloggers' Party @ Homemaker On a Dime, Tip Me Tuesday @ Tip Junkie, Get Your Craft On Tuesday @ Today's Creative Blog, Tutorials and Tips @ Home Stories A to Z, Piece of Work Wednesday @ Primitive and Proper, Tuesday's Treasures @ My Uncommon Slice of Suburbia, Furniture Feature Friday @ Miss Mustard Seed, Frugal Friday @ The Shabby Nest
, 


It looks great!! Love the hardware. :)
ReplyDeleteYour dresser looks great for the little one! Love the hardware and the numbered drawers!
ReplyDeleteGreat job..love the new look! take care, Maryann
ReplyDeleteHi Sarah,
ReplyDeleteI love, love, love how your dresser turned out! Thanks for the detailed step-by-step. It sounds very easy to duplicate and I've always wanted to paint a piece of furniture to have this type of final appearance. The hardware and house numbers just put it over the top! I never would have thought to use that type of house number - brilliant! I was just checking out some clearance hardware in CT yesterday. It's the last place you think of, but sometimes for decor it's a hidden gem.
Hope you cross of some more to-dos this week!
Claire @ alittlesomethinginthemeantime.blogspot.com
Oh I love it!!!!! I am sure you will have lots of fun filling the drawers!
ReplyDeleteMarie
LOVE, LOVE, LOVE this!!! Beautiful transformation!! Love the paint job, Love the hardware, Love the 3-D numbers!!! LOVE IT ALL!! Little Ninja sure is lucky to have such a talented mommy!!
ReplyDeleteI love the dresser! It looks great! It is so "you". I'm so looking forward to seeing the whole room. It is going to be one cute nursery, for sure!
ReplyDeleteit turned out so cute! i love the numbers and hardware! it looks ninja-tastic!
ReplyDeleteYou know what? It DOES look old / new/ country / industrial / fun!
ReplyDeleteThe dresser looks amazing!!! I redid a dresser a few months ago and used house numbers on the drawers too! It's such a great look!!! Nice job!
ReplyDeleteOh yes I like it! I love that you got rid of all the bumpy old paint and started fresh with the grey and Cloud White (one of my favourite whites.) The numbers and drawer pulls are the perfect touch.
ReplyDeleteSo so so cute Sarah!! Love the gray and the numbers, I would have never have thought of that but it looks ADORABLE!!! I am very proud of you, you are only one day past your deadline.
ReplyDeletewhoa sarah!! are you kidding me?? you turned that piece of trash into that? send your cinderella wand my way. please!! you rock.
ReplyDeleteYou did one fantastic job on it, kudos to your dad for helping! I have a dresser sort of like yours and I think I'll try this, I love it and so will "Dude".
ReplyDeleteLove the paint, the hardware and the numbers, I love the dresser!!!!
ReplyDeleteNancy
LOVE IT! The color is perfect and I'm obsessed with the drawer pulls! Where did you get them?
ReplyDeleteGreat makeover and I love the slightly industrial look with the new hardware and numbers - well done :)
ReplyDeletelove your dresser it turned out beautiful and i would love to feature it, let me know if this would be ok
ReplyDeleteLauren
Wonderful makeover!
ReplyDeleteLove the numbers and hardware, great job!
It's lovely!
ReplyDeleteCute! Love the hardware and numbers.
ReplyDeleteLove the makeover. You did a great job. Love the numbers!!
ReplyDeleteThat is just so wonderful- I truly love it- great job!
ReplyDeleteLOVE this dresser makeover! so perfect for a lil mans room! The numbers are fantastic. I seriously cannot wait to see the finale-then pics of your lil one :) SO EXCITING! Pop over to my neck of the woods and see my lil guy who is 2 months today! Goes so so fast!! I still dont have his nursery complete! BAD BAD mommy! How are you feeling?
ReplyDeletexo
LOVE it!!! You did a fabulous job. Those numbers make the math geek in me happy!
ReplyDeleteOh, I love it! It's fantastic. Lucky boy!
ReplyDeleteAwesome transformation!
ReplyDeleteGreetings from Australia♥
Love those numbers - looks great!
ReplyDeleteLooks good Sarah! You'll have to help me out this summer (after the baby's born of course)
ReplyDeleteSeriously so cute!! Found you on pinterest for your shutter how to...
ReplyDeleteJen
athomeinthenorthwestblog.com
This is so cute! Love what you did. My first time to your blog and am now a follower.
ReplyDeleteLove this!! Perfect for the little guy's room!
ReplyDeleteIndustrial cool dresser - adorable! Please stop by to link it up at my party happening now! I would love to have you there!
ReplyDeleteStacey of Embracing Change
http://staceyembracingchange.blogspot.com
Sarah this dresser is gorgeous! Your hard work really paid off and the outcome is stunning!
ReplyDeleteThis is amazing - I love the nickel numbers and the distressed finish! So pretty - pinning it right now for future inspiration :) xx
ReplyDeleteAnna (My Design Ethos)
Love your dresser! Wanted to let you know that I featured it on my blog today on Friday's Fabulous Furniture Finds!
ReplyDeleteBarbara @Chase the Star
Love it. I appreciate nice hardware even if it's over the budget it makes the piece and the numbers are awesome!
ReplyDeleteI wandered over from I'm Busy Procrastinating who featured your treasure today!
Obviously I'm a little late, but wanted to officially tell you I featured this dresser over on my blog today. I love Anthro's Ordinal Dresser and did my own interpretation on a file cabinet. Yours is my favorite of all the other knockoffs I've seen. I love your use of metal house numbers and also the knobs. Very classy!
ReplyDeletehttp://www.imbusyprocrastinating.com/2012/07/ordinal-furniture-round-up.html
What a great transformation! I love the handles (totally worth the splurge) and the numbers are such a great touch!
ReplyDeleteHi there! Lindsey from Better After just shared your project, and I thought I would say what a great job you did. My motto is that everything looks great in white! And I've been seeing those numbers at Home Depot and wanting to add them to something, and you just gave me some inspiration :)
ReplyDeleteIf you're interested, come check me out over at Thrift Diving! :)
Serena
Thrift Diving
www.ThriftDiving.com
Looks awesome! Congrats on your feature on better after's blog! The new cabinet looks awesome!!
ReplyDeleteI am totally in love with this dresser... so in love, I shared it on my blog - I hope you don't mind! Now I must go back to umm... exploring your blog! :o)
ReplyDeletehttp://themarthaanne.blogspot.ca/2013/01/cozycottagecute-another-great-blog.html